Making a Rpi5 Based Smart Vehicle - Part 1

Introduction

In the last couple of years I have implemented two projects on Rpi Pico Based Smart Vehicle. Now Rpi5 is coming. So I am thinking of updating my Pico based projects to Rpi5.

I have preordered a Rpi5 and hope to get it some time in 2023dec. Now I am just reading documentation and tutorials.

The first Rpi5 topic I hope to begin is Rpi5 GPIO, and as usual I hope to write a Blinky program. For now I am collecting references.


References

(1) How to Control the Raspberry Pi 5 GPIO with Python 3 - Les Pounder, 2023oct28

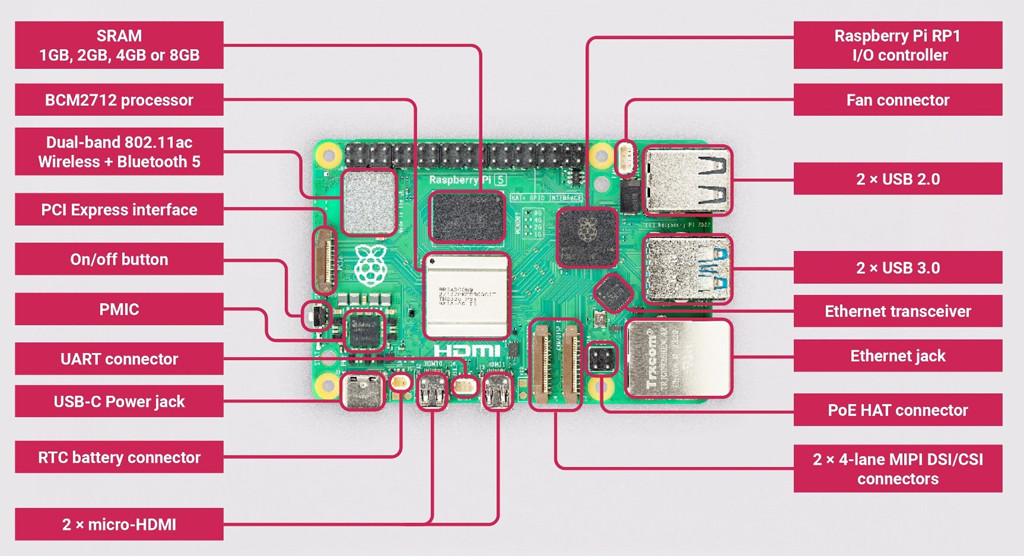
(2) Raspberry Pi 5 RP1 Peripherals - Raspberry Pi Ltd 2023-11-07


Appendices

(A) Rpi5 GPIO Summary

(Ref 1) Raspberry Pi 5 RP1 Peripherals - Chapter 3. Low speed peripherals

3.1. GPIO

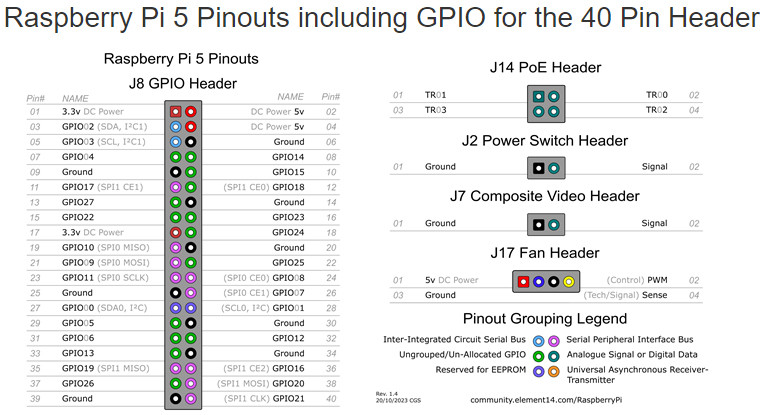
RP1 has 28 multi-functional General-Purpose Input/Output pins available to implement the standard Raspberry Pi 40-pin GPIO connector.

The pins are in a single electrical bank (VDDIO0). The GPIO bank (IO_BANK0) can be powered from 1.8V or 3.3V, but interface timings have been specified at 3.3V. Each pin can be controlled directly by software, or by a number of other
functional blocks.

The bank supports the following functions:

5 × UART

6 × SPI

4 × I2C

2 × I2S - 1× Clock Producer instance, 1× Clock Consumer instance.

RIO - Registered IO interface

24-bit DPI output

4-channel PWM output

AUDIO_OUT - Stereo PWM audio output

GPCLK - General-purpose clock input and output

eMMC/SDIO bus with a 4-bit interface

Interrupt generation from pin level or edge transitions

The functional blocks and their locations on the GPIO pins have been chosen to match user-facing functions on the 40-pin header of a Raspberry Pi 4 Model B.


/ to continue, …

Raspberry Pi 5 Introduction - Raspberry Pi Documentation

Turning it off and back on again

When you plug your Raspberry Pi into power for the first time it will automatically turn on and boot into the operating system without having to push the button.

If you are running the Raspberry Pi Desktop you can initiate a clean shutdown by briefly pressing the power button located on the left-hand side of the board, and then releasing it. This will cause a Desktop menu to appear asking whether you want to Shutdown, Reboot, or Logout. You can select whether you want to shutdown or reboot, or alternatively pressing the power button briefly for a second time will initiate a clean shutdown.


Rpi 5 GPIO

python3-gpiod

It is a pure Python library and has no dependencies on other packages!!

Docs: https://wiki.loliot.net/docs/lang/python/libraries/gpiod/python-gpiod-about

libgpiod: https://git.kernel.org/pub/scm/libs/libgpiod/libgpiod.git/

Installation

python3 -m pip install -U --user pip gpiod


Help command

import gpiod
help(gpiod)
help(gpiod.chip)
help(gpiod.line)
help(gpiod.chip.open)

———
References

(1) GPIO Programming: Exploring the libgpiod Library - Jeff Tranter 2021jan20

(2) GPIO Programming: Using the sysfs Interface - Jeff Tranter, 2019jul10
https://www.ics.com/blog/gpio-programming-using-sysfs-interface

(3) sysfs - Wikipedia

(4) The sysfs Filesystem - Patrick Mochel 2005

sysfs_2023nov2302

———

Appendices

(1) Appendix A - Open command

open(self, device, how:int=1)
    @brief Open a GPIO chip.
    @param device: String or int describing the GPIO chip.
    @param how:    Indicates how the chip should be opened.

If the object already holds a reference to an open chip, it will be
closed and the reference reset.

Usage:
chip.open("/dev/gpiochip0")
chip.open(0, chip.OPEN_BY_NUMBER)

Appendix B - Test command

Test command

python3 -m gpiod.test.blink <chip> <line offset>
python3 -m gpiod.test.bulk_blink <chip> <line offset1> [<line offset2> ...]
python3 -m gpiod.test.sequential_blink <chip> <line offset1> \
    [<line offset2> ...]
python3 -m gpiod.test.button <chip> <line offset> [rising|falling|both]
python3 -m gpiod.test.bulk_button <chip> <line offset> [<line offset2> ...]
    <[rising|falling|both]>

Appendix C - gpiod API

Command Line Tools
Gpiod provides a set of command line tools that are very useful for interactively exploring GPIO functions, and can be used in shell scripts to avoid the need to write C or C++ code if you only need to perform basic GPIO functions. The following commands are provided:

gpiodetect - List all GPIO chips present on the system, their names, labels and number of GPIO lines.

gpioinfo - List all lines of specified GPIO chips, their names, consumers, direction, active state and additional flags.

gpioget - Read values of specified GPIO lines.

gpioset - Set values of specified GPIO lines, and potentially keep the lines exported and wait until timeout, user input or signal.

gpiofind - Find the GPIO chip name and line offset given the line name.

gpiomon - Wait for events on GPIO lines, specifying which events to watch, how many events to process before exiting or if the events should be reported to the console.

chips

The gpiodetect program will detect the GPIO chips that are present. The library uses the term “chip” to identify groups of GPIO hardware functions which may or may not correspond to hardware-level chips. In the case of the Raspberry Pi the GPIO hardware is all contained in the Broadcom SOM (system on a module).

The gpioget and gpioset commands allow reading and writing GPIO input and output lines.
A simple example is the following which sets line 24 of the first chip to a high output level for one second and then releases it:

% gpioset --mode=time -s 1 0 24=1


Libgpiod Library API

The C API allows calling the gpiod library from C or languages that support C APIs like C++. The API is well documented, and too extensive to fully cover here. The basic use cases usually follows these steps:

(1) Open the desired GPIO chip by calling one of the gpiod_chip_open functions such as gpiod_chip_open_by_name(). This returns a gpiod_chip struct which is used by subsequent API calls.

(2) Open the desired GPIO line(s) by calling gpiod_chip_get_line() or gpiod_chip_get_lines(), obtaining a gpiod_line struct.

(3) Request use of the line as an input or output by calling gpiod_line_request_input() or gpiod_line_request_output().

(4) Read the value of an input by calling gpiod_line_get_value() or set the level of an output by calling gpiod_line_set_value().

(5) When done, release the lines by calling gpiod_line_release() and chips by calling gpiod_chip_close().

Other APIs are provided for more advanced functions like setting pin modes for pullup or pulldown resistors or defining a callback function to be called when an event occurs, like the level of an input pin changing.

Appendix D - Blinky program

python blink program

import gpiod
import sys
import time

if len(sys.argv) > 2:
    LED_CHIP = sys.argv[1]
    LED_LINE_OFFSET = int(sys.argv[2])
else:
    print('''Usage:
    python3 blink.py <chip> <line offset>''')
    sys.exit()

chip = gpiod.chip(LED_CHIP)
led = chip.get_line(LED_LINE_OFFSET)

config = gpiod.line_request()
config.consumer = "Blink"
config.request_type = gpiod.line_request.DIRECTION_OUTPUT

led.request(config)

print(led.consumer)

while True:
    led.set_value(0)
    time.sleep(0.1)
    led.set_value(1)
    time.sleep(0.1)

.END

Converting basic motor test functions from Pico to Rpi5 v0.1

*Ref 1 - Pico Thonny Micro Python Driving DC Motor N20/TT130 Using Driver MX1508 *
Making a Rpi Pico Based Smart Vehicle

Ref 2 - Pico Thonny Micro Python Driving DC Motor N20/TT130 Using Driver TB6612FNG
Making a Rpi Pico Based Smart Vehicle

Convert Pico Thonny Micro Python Driving DC Motor TT130 Using Driver TB6612FNG v0.1

import utime
from machine import Pin

motorA = Pin(14, Pin.OUT)
motorB = Pin(15, Pin.OUT)

def forwardMotor():
    motorA.high()
    motorB.low()

def backwardMotor():
    motorA.low()
    motorB.high()

def stopMotor():
    motorA.low()
    motorB.low()
    return

def moveMotorOnce():
    forwardMotor()
    utime.sleep(2)
    backwardMotor()
    utime.sleep(2)
    stop()
    return

def repeatMoveMotor(repeatCount):
    for count in range(repeatCount):
	moveMotorOnce()
    return

def testRepeatMoveMotor4Times():
    repeatCount = 4
    repeatMoveMotor(repeatCount)
    return

.END

Official rpi5 documentation - raspberrypi.com
https://www.raspberrypi.com/documentation/computers/raspberry-pi-5.html

Getting started with your Raspberry Pi 5 (Rpi1 to Rpi5) - raspberrypi.com
https://www.raspberrypi.com/documentation/computers/getting-started.html

Install Raspberry Pi OS using Raspberry Pi Imager - raspberrypi.com
https://www.raspberrypi.com/software/

Rpi5 PCIe NVMe SSD

FINALLY! NVMe SSDs on the Raspberry Pi - Jeff Geerling 604K subscribers

Raspberry Pi 5 M.2 HatDrive! - ExplainingComputers 980K subscribers

Installing the Pimoroni NVMe Base on Raspberry Pi 5 - Pimoroni 8.66K subscribers 2023dec

Pi 5 NVMe SSD for the masses - Maker by Mistake 479 subscribers 2024jan

Understanding M.2, SATA, PCIe and NVMe SSDs - Crucial 2024jan

SATA M.2 SSD vs PCIe M.2 SSD - What’s the difference? – DIY in 5 Ep 172 - Kingston Technology 244K subscribers

Note - PCIe NVMe SSD is 10 times faster than microSD card?

Piromori PCIe NVM SSD Installation Notes

Installing the Pimoroni NVMe Base on Raspberry Pi 5 Pimoroni 8.69K subscribers


Chinese NVME SSD tests

Fake External M.2 NVMe SSD Has MicroSD Cards Inside - Mark Tyson 2023oct03

铠侠RC20 1T固态硬盘SE10 2T SD10ssd M.2 NVMe PCIe4.0 1TB SSD 已售 5000+ 优惠促销¥385起券后¥375起 https://item.taobao.com/item.htm?ali_refid=a3_430582_1006:1110461238:N:43O/fhy6XbsM/vDs4a6dug==:e7b3ab3600418b3b85c8f794b499b4a6&ali_trackid=110_e7b3ab3600418b3b85c8f794b499b4a6&id=604115202383&spm=a21n57.1.0.0