[WIP] Raspberry Pi IOT Server

I am looking at creating a Raspberry Pi server for a tinkerer offline solution to cloud services such as Arduino IOT Cloud, Adafruit IO, ThingSpeak, etc. These services entices you to pay for a premium service by offering you an extremely basic free option knowingly taking out features/function that people will really use. I want to create that premium experience for free and open source for people to freely tinker with.

Inception of Idea
Since receiving the pi-top robotics kit I also received other hardware at the same time getting more interested in IOT and quickly found out how reliant the IOT space is on online cloud services and I just wanted a locally hosted offline solution that i can customize and manipulate how I need it and wanted it open source. Nothing exists to suit my needs.

Target Hardware Platform
The target platform will be for the Raspberry Pi 4B and all my testing will be done with an 8GB model. I also want to have everything compatible with the pi-top[4] and include the SDK and put something together that is custom for the pi-top hardware

Target OS
I will be starting with Raspberry Pi OS 32-bit (Recommended), this is until 64bit becomes officially available not in a beta form, then migrate to 64bit

Following the Project
You can follow the project on GitHub where i will do my best posting issues i run into and how I solved them, guide on what i have installed, configs and also eventually get to a point to have an easy solution to install everything

Changelog

  • 0.0.1 - Mosquitto Installed and tested with an Arduino MKR WiFi 1010 as a publisher and can subscribe from another device

Things that I am looking into/have planned:-
Operating Systems

  • Raspberry Pi OS 32bit - As a proof of concept
  • pi-topOS - if the pi-top team want to support it on their OS
  • Ubuntu Server 20.04.2 LTS - possibly but low on the priority

I would love to build it upon pi-topOS and thought about it, however, I am looking to make the build light weight and use little resources as possible. I have tried making my own lite version of pi-topOS but have issues when removing some software.

I also do not know how to build an OS image but when it gets to a stable version for a release, it will be something I will look into, but to begin with, I will look into an install script

Software

  • MQTT - Eclipse Mosquitto open source MQTT broker
  • HTTP API - to interact with MQTT over HTTP for an alternative connection type
  • InfluxDB - Scalable datastore for metrics, events, and real-time analytics
  • Grafana - open source analytics & monitoring solution for every database
  • MatLab - Don’t really know about this but will look into the possibility of using it
  • Custom pi-top[4] Scripts - Building on top of the pi-top SDK, expanding the capabilities to interact with the server environment to allow monitoring of the pi-top hardware and connections
  • QT5/6 Interface - Probably the most ambitious part of this is a User Interphase for the server

Hardware Connectivity
I list hardware because there is some things that I have considered when doing this.

  • WiFi - I will be disabling WiFi as default because this will basically be a server environment, it is recommended to have an ethernet connection for a more stable connectivity.
  • Bluetooth - Not sure if I will leave Bluetooth enabled, but i am considering it for those that use Bluetooth peripherals like Keyboards and Mice especially those that use the pi-top keyboard.
  • LoRa/LoRaWAN - I really want to support LoRa but really do not know much about it but will expand on the connection capabilities and allow greater distance for device communication

As a current starting point i am starting with Raspberry Pi OS 32bit Recommended and removed everything i didn’t want installed and also installed pi-top SDK, Arc Theme, Papirus Icons and Breeze Cursors and added a cool background image till i can get a new one to represent an IOT Server :slight_smile:

Mosquitto - added Mosquitto to changelog
I have it installed and up and running, I have an Arduino MKR WiFi 1010 with a MKRENV shield running of battery power publishing data to Mosquitto and its working without issue. I can connect to Mosquitto using MQTT explorer and can confirm that the data is, indeed, being published. I tried a mobile app to connect and subscribe to topics and can subscribe and get live data as its published. All of this is only done via local LAN, not externally.

I have Mosquitto running on an authentication basis which requires Username and Password. no TTS has been added, may look into that for future to improve security for the connection

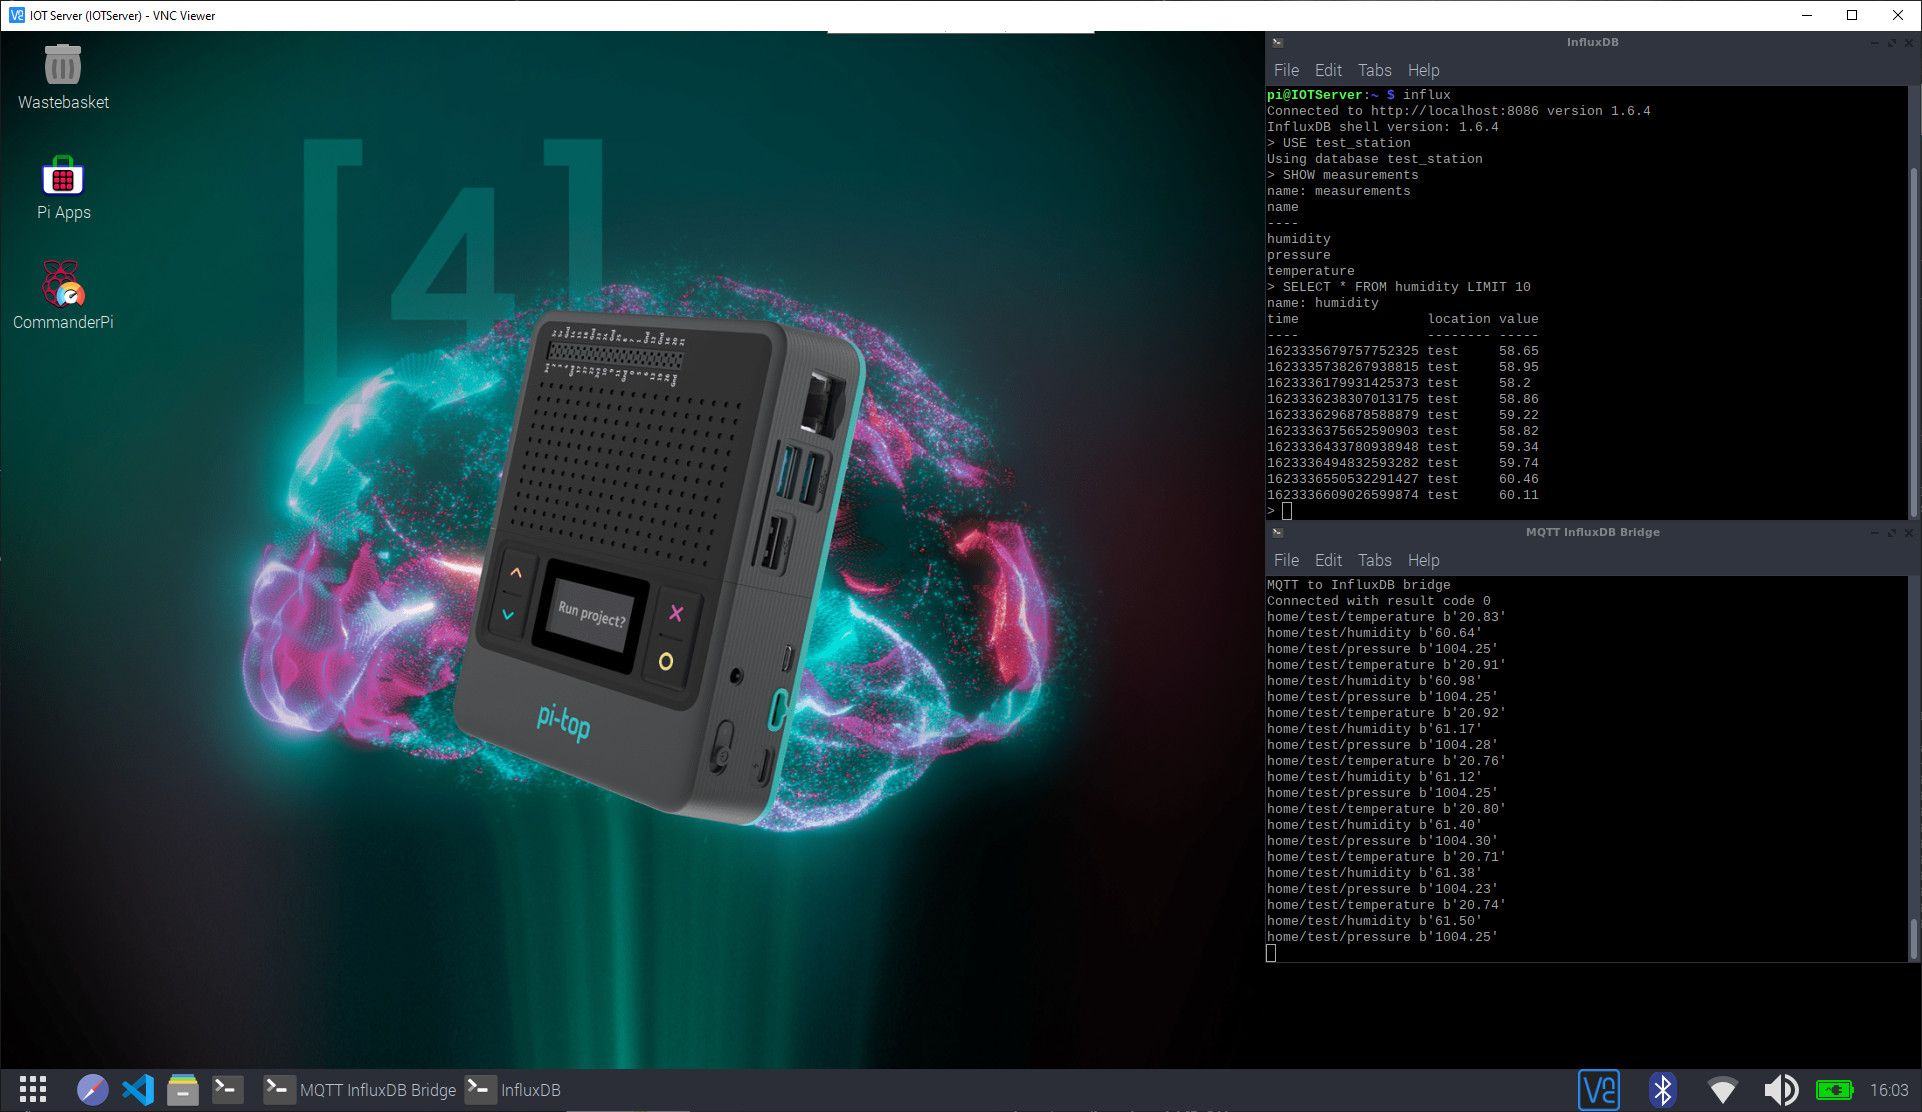
Mosquitto Running on pi-top[4]

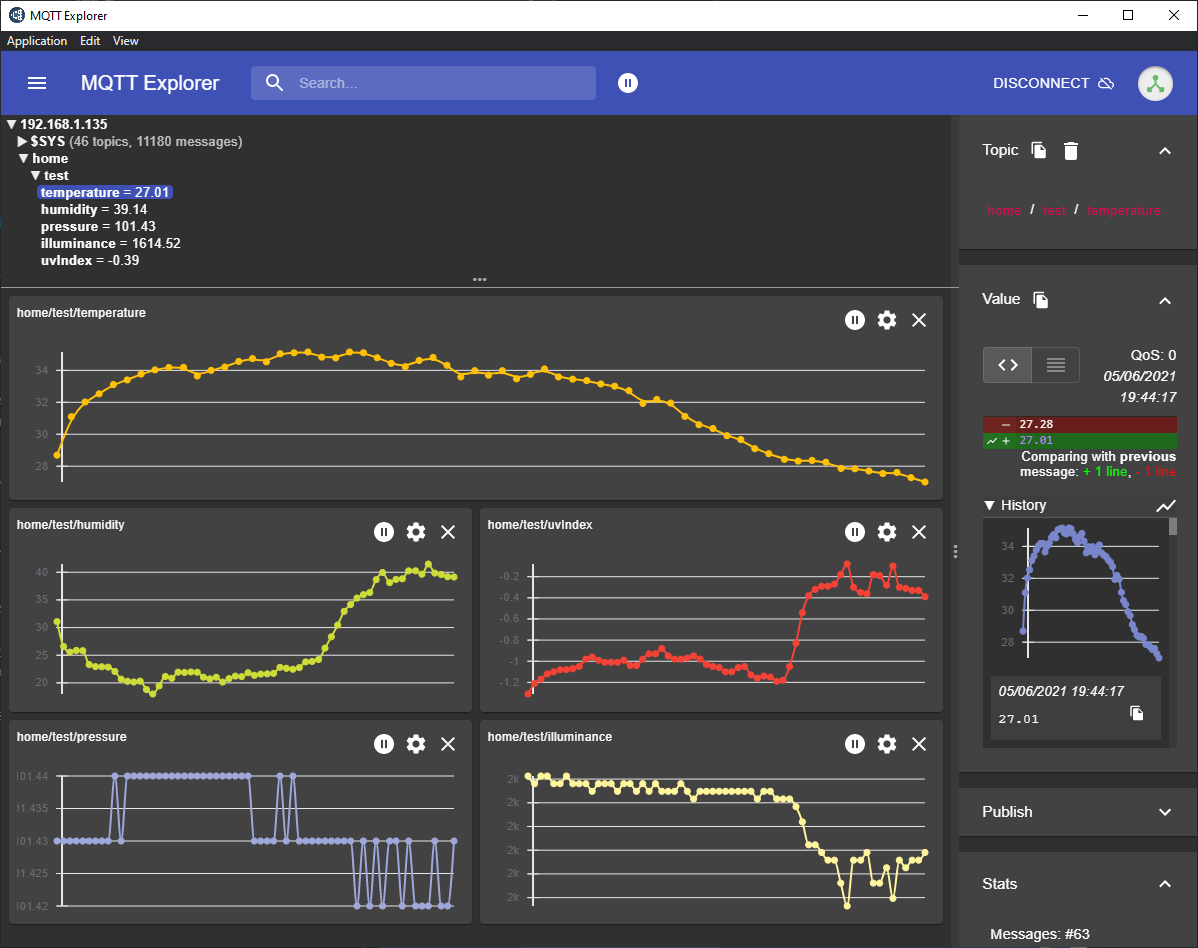
Viewing Data via MQTT Explorer

Viewing Data as a Subscriber to topic via Mobile Phone

Mosquitto Is a success and working as expected, this is not running automatically, only manual running to begin with

Arduino Code
Here is the code used for the Arduino MKR WiFi 1010 and ENV shield for those that is interested, not hiding username and password for the MQTT server because its the same as RPiOS default but removed the WiFi SSID and password.

Data is published to Mosquitto every 1 min

#include <PubSubClient.h> // Connect and publish to the MQTT broker
#include <WiFiNINA.h> // Enables the WiFiNina to connect to the local network
#include <Arduino_MKRENV.h> // communicate with the MKRENV Shield

// WiFi
const char* ssid = "SSID_NAME_HERE";         // Your personal network SSID
const char* wifi_password = "WIFI_PASSWORD"; // Your personal network password

// MQTT
const char* mqtt_server = "192.168.1.135";  // IP of the MQTT broker
const char* humidity_topic = "home/test/humidity";
const char* temperature_topic = "home/test/temperature";
const char* pressure_topic = "home/test/pressure";
const char* illuminance_topic = "home/test/illuminance";
const char* uvIndex_topic = "home/test/uvIndex";
const char* mqtt_username = "pi"; // MQTT username
const char* mqtt_password = "raspberry"; // MQTT password
const char* clientID = "client_ArduinoMKR1010"; // MQTT client ID

// Initialise the WiFi and MQTT Client objects
WiFiClient wifiClient;
// 1883 is the listener port for the Broker
PubSubClient client(mqtt_server, 1883, wifiClient); 

// Custom function to connect to the MQTT broker via WiFi
void connect_MQTT(){
  Serial.print("Connecting to ");
  Serial.println(ssid);

  // Connect to the WiFi
  WiFi.begin(ssid, wifi_password);

  // Wait until the connection has been confirmed before continuing
  while (WiFi.status() != WL_CONNECTED) {
    delay(500);
    Serial.print(".");
  }

  // Debugging - Output the IP Address of the ESP8266
  Serial.println("WiFi connected");
  Serial.print("IP address: ");
  Serial.println(WiFi.localIP());

  // Connect to MQTT Broker
  // client.connect returns a boolean value to let us know if the connection was successful.
  // If the connection is failing, make sure you are using the correct MQTT Username and Password (Setup Earlier in the Instructable)
  if (client.connect(clientID, mqtt_username, mqtt_password)) {
    Serial.println("Connected to MQTT Broker!");
  }
  else {
    Serial.println("Connection to MQTT Broker failed...");
  }
}

void setup() {
  Serial.begin(9600);
  while (!Serial);

  if (!ENV.begin()) {
    Serial.println("Failed to initialize MKR ENV shield!");
    while (1);
  }
}

void loop() {
  connect_MQTT();
  Serial.setTimeout(5000);

  float t = ENV.readTemperature();
  float h = ENV.readHumidity();
  float p = ENV.readPressure();
  float i = ENV.readIlluminance();
  float u = ENV.readUVIndex();
    
  Serial.print("Temperature = ");
  Serial.print(t);
  Serial.println(" °C");

  Serial.print("Humidity    = ");
  Serial.print(h);
  Serial.println(" %");

  Serial.print("Pressure    = ");
  Serial.print(p);
  Serial.println(" kPa");

  Serial.print("Illuminance = ");
  Serial.print(i);
  Serial.println(" lx");

  Serial.print("UV Index    = ");
  Serial.println(u);

  // MQTT can only transmit strings
  String ts="Temp: "+String((float)t)+" C ";
  String hs="Humi: "+String((float)h)+" % ";
  String ps="Pres: "+String((float)t)+" kPa ";
  String is="Illu: "+String((float)t)+" lx ";
  String us="UV  : "+String((float)t)+;

  // PUBLISH to the MQTT Broker (topic = Temperature, defined at the beginning)
  if (client.publish(temperature_topic, String(t).c_str())) {
    Serial.println("Temperature sent!");
  }
  // Again, client.publish will return a boolean value depending on whether it succeded or not.
  // If the message failed to send, we will try again, as the connection may have broken.
  else {
    Serial.println("Temperature failed to send. Reconnecting to MQTT Broker and trying again");
    client.connect(clientID, mqtt_username, mqtt_password);
    delay(10); // This delay ensures that client.publish doesn't clash with the client.connect call
    client.publish(temperature_topic, String(t).c_str());
  }

  // PUBLISH to the MQTT Broker (topic = Humidity, defined at the beginning)
  if (client.publish(humidity_topic, String(h).c_str())) {
    Serial.println("Humidity sent!");
  }
  // Again, client.publish will return a boolean value depending on whether it succeded or not.
  // If the message failed to send, we will try again, as the connection may have broken.
  else {
    Serial.println("Humidity failed to send. Reconnecting to MQTT Broker and trying again");
    client.connect(clientID, mqtt_username, mqtt_password);
    delay(10); // This delay ensures that client.publish doesn't clash with the client.connect call
    client.publish(humidity_topic, String(h).c_str());
  }
  // PUBLISH to the MQTT Broker (topic = Humidity, defined at the beginning)
  if (client.publish(pressure_topic, String(p).c_str())) {
    Serial.println("Air Pressure sent!");
  }
  // Again, client.publish will return a boolean value depending on whether it succeded or not.
  // If the message failed to send, we will try again, as the connection may have broken.
  else {
    Serial.println("Air Pressure failed to send. Reconnecting to MQTT Broker and trying again");
    client.connect(clientID, mqtt_username, mqtt_password);
    delay(10); // This delay ensures that client.publish doesn't clash with the client.connect call
    client.publish(pressure_topic, String(p).c_str());
  }
  if (client.publish(illuminance_topic, String(i).c_str())) {
    Serial.println("Illuminance sent!");
  }
  // Again, client.publish will return a boolean value depending on whether it succeded or not.
  // If the message failed to send, we will try again, as the connection may have broken.
  else {
    Serial.println("Illuminance failed to send. Reconnecting to MQTT Broker and trying again");
    client.connect(clientID, mqtt_username, mqtt_password);
    delay(10); // This delay ensures that client.publish doesn't clash with the client.connect call
    client.publish(illuminance_topic, String(i).c_str());
  }
  if (client.publish(uvIndex_topic, String(u).c_str())) {
    Serial.println("UV Index sent!");
  }
  // Again, client.publish will return a boolean value depending on whether it succeded or not.
  // If the message failed to send, we will try again, as the connection may have broken.
  else {
    Serial.println("UV Index failed to send. Reconnecting to MQTT Broker and trying again");
    client.connect(clientID, mqtt_username, mqtt_password);
    delay(10); // This delay ensures that client.publish doesn't clash with the client.connect call
    client.publish(uvIndex_topic, String(u).c_str());
  }
  client.disconnect();  // disconnect from the MQTT broker
  delay(1000*60);       // print new values every 1 Minute
}

Documentation completed and example Arduino code uploaded

InfluxDB
I am currently working on this right now and making some progress, I am also replicating the work on a headless install, which has proven challenging to get set up but is currently working

Now I just need to make the write up for this and an automated installer too, also had to use an Arduino RP2040 Connect as a 2nd micro controller publisher. I have also got to make the MQTT InfluxDB bridge to be able to start on its own, preferably a daemon but that’s for another time

I have been thinking my approach to the whole IOT server idea and I think my scope of work is a little to ambitious for my skill level at this time as i know that part of it i really have no idea what i am doing.

What does this mean for the project?
nothing much as I am just re-evaluating the scope of the project and starting over. Some of the work done can be recycled since I will still be using it so nothing has changed regarding the work already put in. The scope has changed a little and taking a different path to reach the end.

The way I want to do things is not possible with the new scope but other things are

What’s the new scope
The new scope for the project will basically be the same, build an IOT server but to begin with i will not be writing custom backend and UI since that’s what i lack the skills to do at this time. The new approach to it will be working with InfluxData’s TICK stack instead, TICK Stack means: -

  • Telegraf - Agent for colleting and reporting metrics and events
  • InfluxDB - Purpose-Built Time Series Database
  • Chronograf - Complete UI for the InfluxData platform
  • Kapacitor - Real-Time streaming data processing engine

This is how the TICK Stack looks

There is 1 thing that is quite nice about all this, you can communicate with InfluxDB directly from a micro controller, they have Arduino libraries already for it, hopefully they can make a micropython one too for RP2040, if not then MQTT still exists

Other Work in the background
While i will be working with InfluxData’s TICK Stack, I will be working with InfluxDB v2.0, this is 64bit only and working on that on 2 environments, Ubuntu server on an Intel NUC Skull Canyon and also on a Raspberry Pi using RPiOS 64bit.

This does change my workflow greatly as I can work in the background on a 64 bit version of the core of things, with little work to do in the long run and also provide an alternative.

Multiple version support
There is 2 versions of InfluxData’s Stack

  • v1.8 - Works on 32bit and TICK stack has separate installs
  • v2.0 - Most of the TICK stack has been integrated and makes things easier but also works differently

I really want to have v2.0 on 32bit but that just is not happening

Changes to my repo
The current repo will get an overhaul and will be working on different branches

  • Master - Raspberry Pi OS 32bit installs
  • pt-top - Raspberry Pi OS 32bit install with SDK implementations
  • ARM64 - Raspberry Pi IS 64bit background work - preparing most work for mainstream support
  • AMD64 - Ubuntu Server 20.04LTS 64bit
  • pt-IOT - This will be the ultimate end goal from my original scope but not for now

The work I do on this project will be replicated across all branches as best as possible and this allows me to have most of the work done for 64bit switch over later on down the line.

InfluxData’s TICK stack does not have the best documentation going so a lot of this will be documentation and guides on how to do things, at least for v1.8. v2.0 is a little different as there is alternative ways to do thing and easier ways too.