Pi-top [3] RK3399 upgrade

Hi there,

I’m opening this new thread to collect some information about a possible upgrade path to Rockchip’s RK3399. The original Raspberry Pi 3B+ was always feeling sluggish with a poor Wifi strength making the connection unreliable, so this acted as a motivation to start exploring for alternative boards that could fit. The requirement being that it should fit without modifying the case.

The Pi 4 is a natural option, that could fit by unsoldering the misplaced Ethernet and USB ports, still replacing the micro HDMI port is a bit challenging. The good point about this is that it would allow to keep the original OS which is very nice.

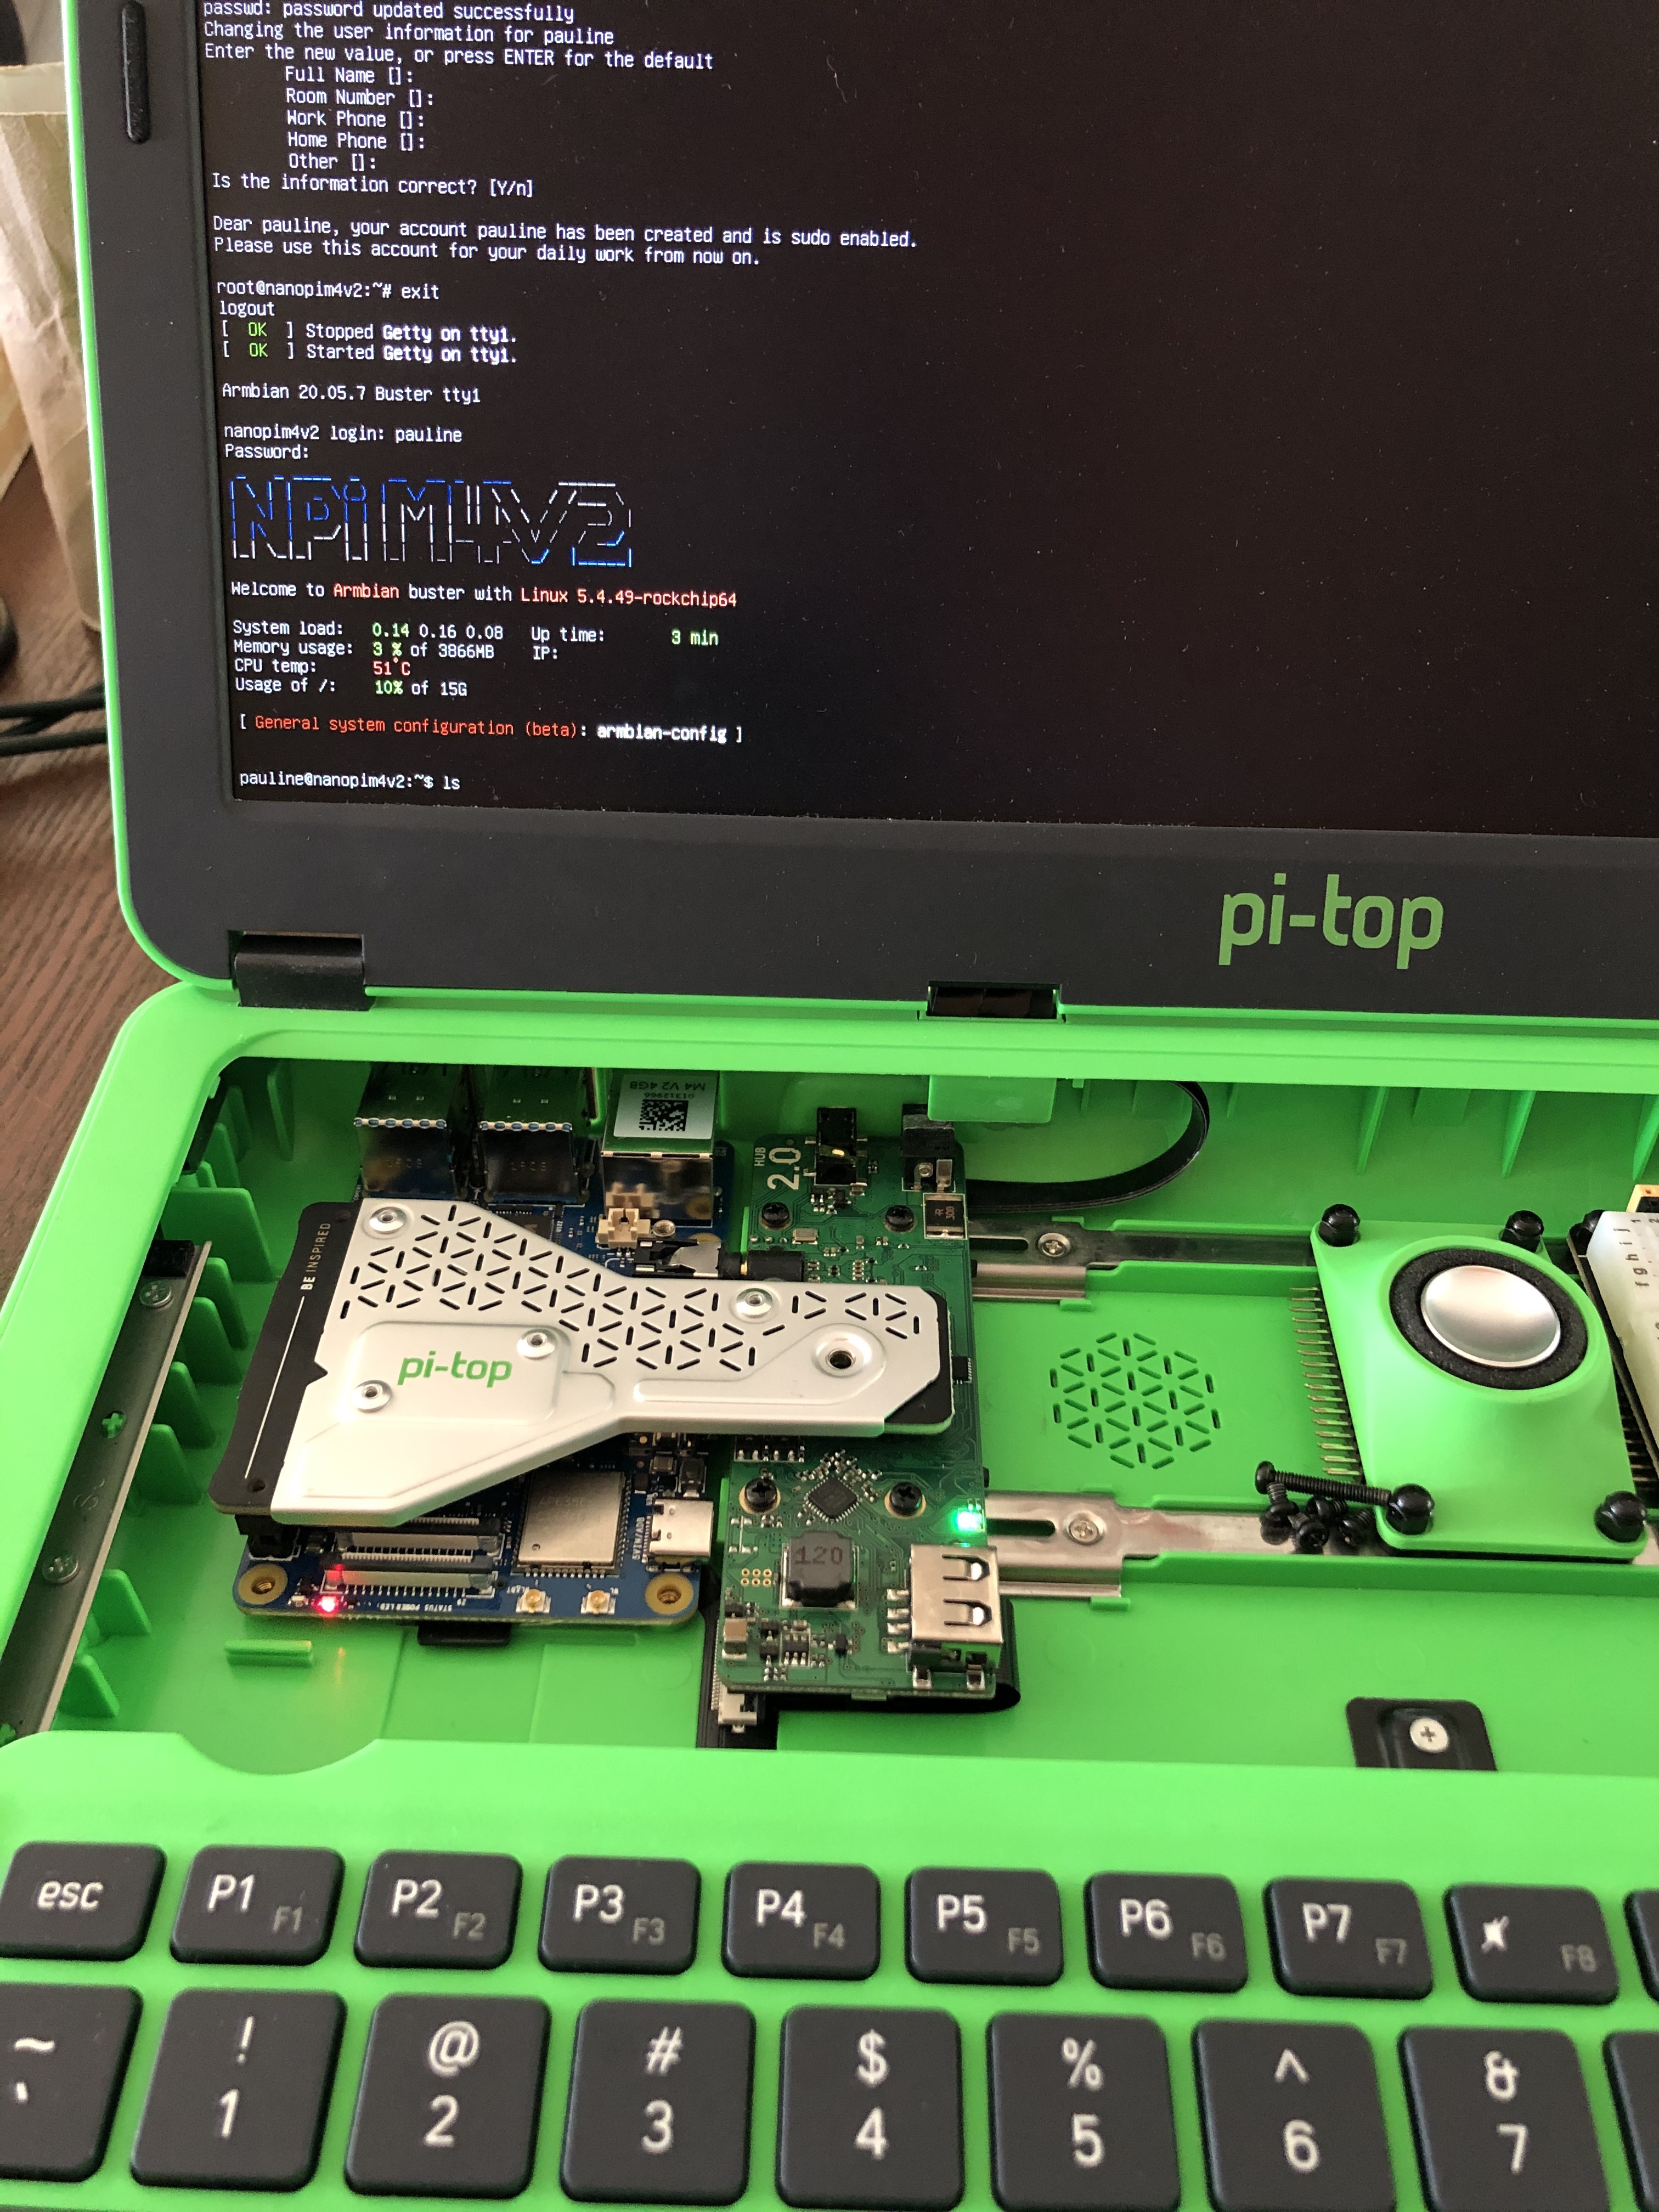
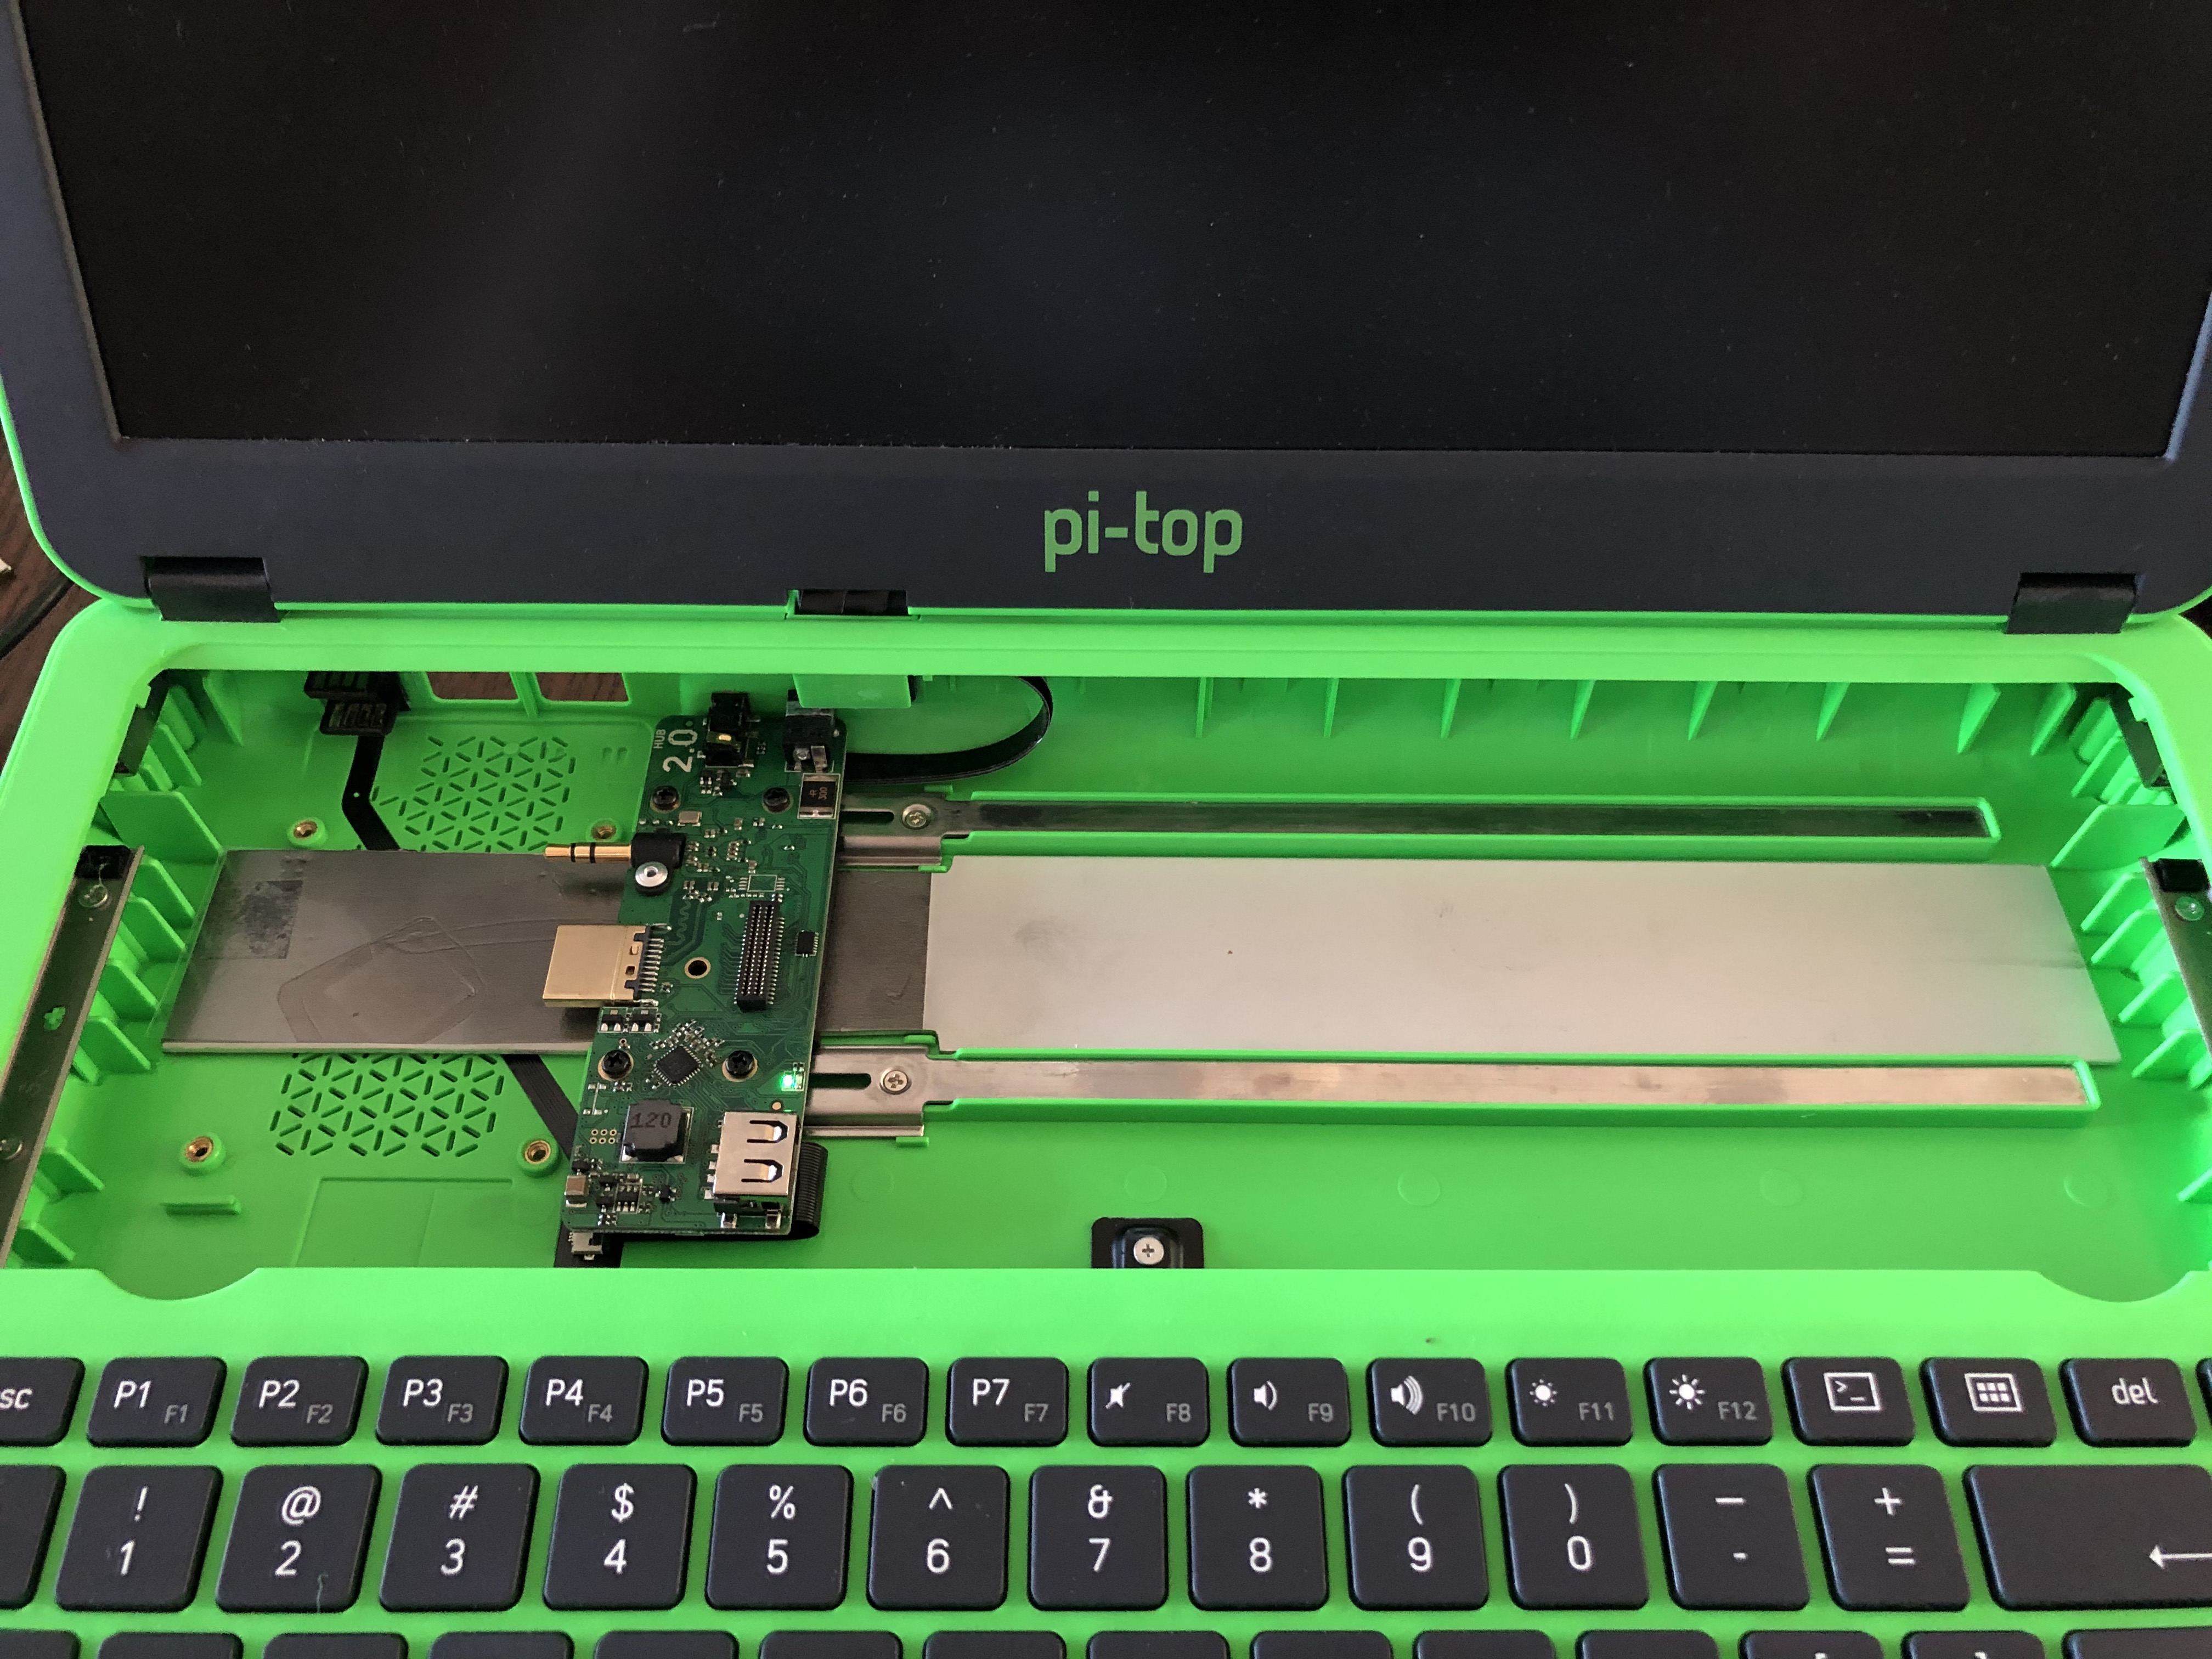
Looking for a drop-in replacement, one can find two SBCs that have the same Pi 3 compatibility, the Nano PI M4 and the RockPi 4. The latter have a M.2 slot underneath that will probably be troublesome given the 3 mm clearance in the case, and it’s not clear if it can accept to be powered from the GPIO. The NanoPi M4 can fit in, be powered from the GPIO, comes with Wifi and Bluetooth antennas, the only drawback at this point is that pi-top OS won’t run on it.

Armbian runs just fine in its Debian version, some features are not functional out of the box and will have to be addressed:

  • hub power off after shut down, one have to press the button for a few seconds to force it
  • battery indicator
  • speaker (sound works just fine through bluetooth)
  • GPU 3D acceleration

20-07-26%2015-24-45%206214

One warning: the board is quite busy underneath and I managed to rip off one component during the insertion and removals. Its proximity with the stud is certainly asking for some attention. With the IC smashed the board would not boot when powered from GPIO but run just fine when plugged with USB-C. A bit of tricky soldering and some luck brought it back to life…
smashed-IC

1 Like

On the NanoPi the CPU is placed on the other side of the board, some sort of thermal dissipation must be added here. The case can accommodate for a 1.2 mm thick piece of aluminum, with two 17 um layers of graphene sheet to help for the conductivity. Everything fits nicely under the hub, but it’s a bit thick for the NanoPi so only the front screw can be tightened with some flexing of the PCB. Maybe 0.2 mm less in thickness would help. A 1.2 mm shim and a bit of double sided adhesive tape can make the bridge thermal pad contacting the PCB right a the back of the CPU. This one is probably not required as the GPIO pins were conducting the heat toward the bridge quite well during the first trials.

The CPU was idling at 81°C at 2.0 GHz without any cooling, with this arrangement, and back to 1.8 GHz, the CPU is now around 50°C doing light browsing.

20-07-26%2019-24-30%206217

1 Like

Next step is to make the hub automatically powering off.

In the device management repository, poweroff/poweroff-v2 file, the hub is probed on idc-1 bus, while on the NanoPi it’s sitting on i2c-2. I still have to plumb this in systemd.

This is really cool! Looking forward to seeing the final result after the software is linked up

Hello again,

Here is a small update after some days playing with the setup.

Armbian was moved to its Ubuntu flavor, where Panfrost is already installed so there is GPU acceleration.

Wifi stopped working after updating, but the (temporary) solution was to hold the firmware package: sudo apt-mark hold armbian-firmware

Sound interfaces are detected correctly, still pulseaudio defaults to the analogue output so one need to switch to hdmi each time the laptop is powered up. For the speaker initialization one has to copy the ptcommon module in the python3 folders, then modify the initialization script to pick up i2c-2 instead of i2c-1, and fire it at startup from rc.local. Volume control from the keyboard works out of the box.

Poweroff was also just a matter of changing the i2c bus in the poweroff script and install the systemd service.

What’s left for the moment is the battery monitor. The pthub2 module is not working for any reason, but ripping out the code to read the battery state from the hub registers works. Anyway a plugin for xfce would need to be developed to display the battery status, which is a bit cumbersome. Maybe displaying it on the desktop with conky is simpler, this needs a bit of thinking. Of course a kernel driver would be the best as it would allow to reuse the existing battery plugin…

Last point so far, switching the cpu scheduler from ondemand to conservative helped to lower the overall heating.

The RK3399 pi-top is quite an enjoyable experience now :smiley:

3 Likes

Thanks for all the work on this. I am considering doing the same. That is as soon as the Nano pi are removed from temporary hold. I was thinking about using a heat sink on the CPU and cutting a hole in the bottom of the case. The aluminum plate is the better solution. What about using thermal paste on the CPU to conduct heat to the aluminum plate. Instead of double sided tape.

Hi,bobim,can you share the aluminium plate cad drawing here?thx

Next upgrade: RK3566 (with Pine64 SOQUARTZ or Radxa Rock CM3) via this

https://www.waveshare.com/product/cm4-to-pi3-adapter.htm?___SID=U

Hello

Phipi
And the ROCK PI 4 ? Or ROCK PI X or ROCK PI 4B, 4C

it strongly resembles the pi 3 b+

https://rockpi.org/rockpi4

Regards
Mickbh

Sorry for this post i am french

Hi Thinking of doing something similar to my Pi Top [3]. I have an ASUS Tinker Board v1.0 with 2GB RAM and that worked OK. So I bought an Orange Pi 3B (powered by Rockchip RK3566 quad-core 64-bit processor up to 1.8GHz main frequency, integrated ARM Mali G52 2EE graphics processor) 8GB RAM and 128 GB eMMC drive. Seems to be a simple plug-and-play installation. But as eMMC fits underneath the board this may represent a problem. I’ll keep you posted as I progress and will greatly benefit from any advice anyone can provide. If all else fails, I still have the Tinker Board to fall back on.
Cheers, ian

Looking forward to hearing your verdict on the OPi 3B - including whether you manage to squeeze in the eMMC underneath (the SBC retaining screws should just about manage to hold that down).

I’m hoping to test the recently released 4Gb Amlogic A311D-based Libre Computer “Alta”, which sounds promising; reports indicate that the ports for 3.5mm A/V and HDMI line up ok with the hub but we need to be able to remove the substantial heatsink that Libre Computer fit to the Alta in order to connect the pi-top’s thermal bridge.

I will update here/separate thread once I know more.

I’ve installed the OPi3B into my Pi-Top [3] with only two of the 4 screws holding down. As they’re diagonally opposite it looks secure. Brief tests before Christmas break look promising. Everything working from SD card. Using Orange Pi Ubuntu image. Have yet to use eMMC - holiday season.

Looks very much like a drop in solution. Will be testing sound and battery early 2024. Will check Rene Richarz git to see if his RPi code will work.

Will post more soon.

Well, this sounds promising:

Good news. Are you able to make use of the M.2 NVMe connector? Perhaps with Radxa’s FPC adapter?
There’s an interesting assessment of the OPi3B here: https://all3dp.com/2/orange-pi-3b-review-specs/

Hi folks,
I was looking for a similar drop-in replacement for my aging RPi 3B and saw the Orange Pi 3B on Explaining Computers. I bought mine with 8GB RAM and 256GB eMMC drive module.

It fits in OK but two diagonal screws cannot be tightened without straining the board. I left them out and it doesn’t seem to be an issue.

Limited progress so far due mostly to trying to determine which Linux OS to use.

  • Orange Pi version of RPiOS works ok, but after update and upgrade refuses to boot. Hangs on boot.
  • Orange Pi OS (Arch and OH) have similar issues and I had problems with my Ethernet connection.
  • Orange Pi Ubuntu and Debian images are much better. I’m currently using Debian.
    Orange Pi OS Debian
    =================
  • So far OPiDeb is running after update and upgrade and my WiFi and Ethernet are working well.
  • External sound via headphone Jack works well, but essentially mute unless using playback from YouTube, music, etc. This seems typical of Pi-Top [3] internal & external sound using RPi3b.
  • Screen image is pin sharp as always on Pi-Top and all keys and trackpad functioning properly.
  • Power down from OS OK but must also hold Power Button for few seconds to shut down.
  • Performance. Good, but not in the RPi 4/400/5 class (as I suspected) but superior to RPi 3/3B.
  • Micro SD card slot has push/push insert/eject feature which in testing is very nice to have.
  • eMMC is displayed but unmounted as I’m waiting on my adapter to arrive so I can transfer RPiOS to it. From all reports it should run much, much faster than SD Card.
  • I noticed that the hub has an extra internal USB connector and forums suggest it can be used to boot a USB/SSD drive, so I’ll give that a test.
  • software download seems to work via the Software app, but I will do more tests.
    To Do List
    ========
  • get OS on eMMC - probably mid to late January as it’s just been posted and I live in Western Australia.
  • trial USB/SSD boot for OS and give estimates of speed increase-if any.
  • try OPiDeb as main OS. Trial OPiUbuntu if time permits.
  • get either OS stable and trial as a daily driver.
  • compare OPi 3B (8GB RAM) in Pi-Top [3] with RPi 3B (1GB RAM) and ASUS Tinker Board rev 1.2 (2GB RAM).

Anyone have any other ideas? (Please bare in mind that I’m 72 years old and have very limited Linux experience and even less technical electronics knowledge and skills - hence my hands-on amateur KISS {Keep It Simple Stupid} approach).

Bye Ian :sleeping:

Ok. My latest findings —-

  1. Orange Pi 3B:
    limited success due to inability to secure Orange Pi with eMMC drive safely. Strain placed on components and only one screw actually secured. Broke magnetic screw holders on internal speaker.
    Raspian unstable and almost any update or upgrade reverts back to Debian XFCE interface.
    Unable to activate internal speakers so have to lug around external cable connected speakers.
    Location of eMMC drive interferes with secure installation and needs to be removed, thus negating any gains. Without it the Pi-Top is no more functional than with ASUS Tinker Board.
    Personal preference - do not like Orange Pi version of Debian or Ubuntu. Almost indistinguishable from each other and no additional software such as WP, Spreadsheets, Web Browser - too difficult for me.

  2. ASUS Tinker Board (rev 1.2).
    Although a little slower than Orange Pi (both using SD card) the TinkerOS software is fully featured and automatically supports the internal speakers.
    On the Internet the difference is less significant as the Orange Pi seems laggy and slow to respond. Also TinkerOS much better with YouTube playback. Orange Pi really sluggish and drops many frames with YouTube.
    TinkerOS suits me more with its layout and installed applications. It’s visually prettier and more stable. Also menus permit more flexibility than Orange Pi OS”s.

  3. Conclusion
    For the time being I’ll leave the Tinker Board installed in Pi-Top [3] and use the Orange Pi elsewhere.
    Tinker Board is hardly pushed when running Tinker OS. There’s plenty of RAM available with 2GB and internet is much faster.
    Tinker Board is an easy fit and doesn’t place strain on internals of Pi-Top [3] when installed.
    If anyone else is contemplating such a Pi-Top [3] upgrade I’d say avoid the Orange Pi. Does not seem to be much after sales support or development of software (when compared to Raspberry Pi). Not that ASUS is much better - just more polished.
    Finding internal Pi-Top USB connector on the HUB works for my SSD gives me hope of speeding “Kermit-II” up (green Pi-Toplaptop is Kermit-II).

So my “Kermit-II” with stay for the moment. Honestly if you want a Linux laptop and want Raspian I think buying a used laptop with 4-8GB RAM, converting to SSD and installing Raspian x86 would be a better long term idea. Got a few machines looking like possible candidates.

Unfortunately Pi-Top seems to have abandoned the Pi-Top [1] & [3] from what I can see. With Raspberry Pi Org constantly changing the Raspberry Pi layout and seemingly uninterested in upgrading the RPi3B to 2GB or more, we’re stuck with what’s available. I can’t afford to keep testing boards, so Tinker it is for the moment.

Cheers, Ian

I tried their other board, the “Renegade” (ROC-RK-3328-CC)

unfortunately the parts’ positions are just not close enough to the RPI3

the HDMI port seems to stick out 1mm more from the edge and the GPIOs are 1mm closer to the top edge

these both make the beautiful-but-annoying cooling bridge PCB unable to connect the Renegade and the Hub board because the B2B connectors at the Hub don’t align

otherwise it would seem to be a good enough fit, the CPU pad under the bridge was mostly overlapping the rockchip CPU

if only we could source some of those male B2B connectors from “Goxconn”: https://glconnector.com/product/0-8mm-btb-female-connector-btb-pitch-0-8mm-h3-0-6-5female-2/

1 Like

Nice find on those B2Bs! I tried locating them myself a couple of years ago with the same problem you found. I did suggest a simple wire loom or FPC style connector could be produced by Pi-Top as an accessory/adapter for connecting other SBCs’ GPIOs to the hub but that didn’t come to fruition either.

As regards Libre Computer SBCs, I can now confirm that I was able to successfully fit the Alta model in the pi-top [3] chassis, with the hub appropriately sited (HDMI and 3.5mm A/V ports lined up just fine) and, after gently teasing the heatsink off the CPU and RAM (be careful as it’s stuck on quite firmly with adhesive tape), I was able to fit the cooling bridge from the GPIO pins to the B2B connector on the hub.

I have yet to try actually running an OS on this board as Libre Computer are supposed to be releasing an update later this month, I think, for greater ability to simply run whichever vendor’s aarch64 images (Fedora, Nix, Ubuntu etc.) without the end user having to modify them first.

But the fact that we are finally able to correctly fit a decent, USB3 capable SBC with more than 1Gb RAM in the pi-top [3], without modification*, is great!
*I don’t count removing the heatsink as modification

N.B. I have not yet tried this assembly with an eMMC fitted beneath the Libre Computer so it’s possible that might change things.