
This is for anyone that is interested, some thing I wrote when I was using an Intel Skull Canyon as a dev machine and tested it out on the pi-top, since some people use their pi-top for everything, it might come in handy. its exactly the same as I typed up back then so excuse the Ubuntu UI
GPG Keys and Signing GitHub Commits with VSCode
This is something I had some trouble initially setting up as i didn’t really understand the process to begin with. I finally got there and its not as bad as it first appeared once I figured out the issues i had.
Set up Git
First thing to do is tell Git what your name and email address is. This is done in terminal
git config --global user.name "NAME"
git config --global user.email "EMAIL"
If you want to hide your email for privacy reasons on your commits, github provides a solution for you. Go to https://github.com/settings/emails and check keep my email address private and in the text underneath will provide an email for you to use

Setting up GPG
- To do this, run terminal and type in
sudo apt install gnupg(should be installed but no harm in checking) and follow through with any prompting you may get. - Install a popular GUI, in the terminal and type in
sudo apt install kgpg - Launch KGpg, can be found in Accessories in the menu.
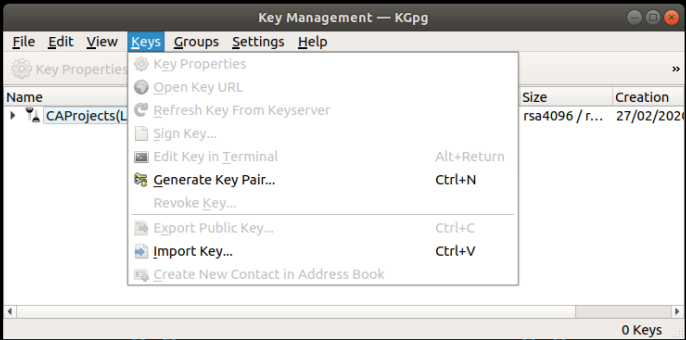
- After you have completed the steps you will get the main UI, go to
Keys > Generate Key Pair
- Name : Enter your name
- Email : this must match GitHub or you can use the Github no User email
- Expiration : Never
- Key size : 2096
- Algorithm : RSA & RSA
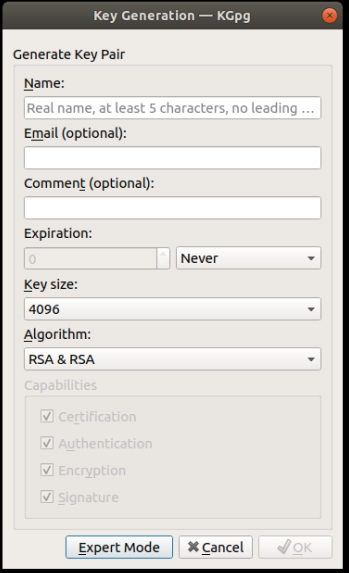
- Click OK when done. This will prompt you to enter a passphrase
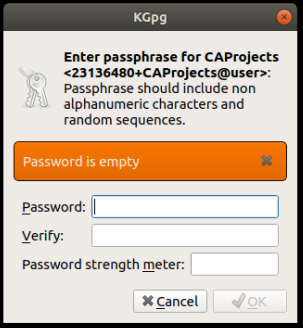
- The next step will take some time to complete so please be patient. When its complete you will get a prompt. Save the revoke file somewhere safe
- Select the entry that has appeared in the UI and go to
Keys > Export Public Key... - Select file and Export everything. Go to where you saved the file and open it with a text editor.
- You need to copy the whole text including
-----PGP PUBLIC KEY BLOCK-----and-----END PGP PUBLIC KEY BLOCK----- - Log into your GitHub account and go to settings > SSH and GPG keys or can visit this link https://github.com/settings/keys
- Click
New GPG Keyand paste the key you copied and click Add GPG Key
Telling Git About GPG key
This part is done in the Terminal.
- Enter gpg
--list-secret-keys --keyid-format LONGto list your keys, the highlighted key will be what you need
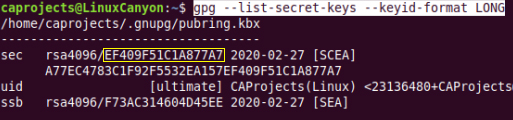
- Copy the key to use the key to set the sign key
-
git config --global user.signingkey {key}replace {key} with the key that you had copied from the previous step
Thats all you need to do in this step
VSCode and GPG
This is for those that use VSCode, There is not much to do here, just a simple setting change.
- Open the settings
Ctrl+, - search
gpg - Check the tick box for
Git: Enable Commit Signing
next time you make a commit you will be asked for your passphrase and possibly your GitHub Credentials.
What does all this do
When you check the commits of a repository it will 1 of 3 things
- Green Verified badge - Everything is setup perfectly
- Gray Unverified badge - Something is setup wrong
- no badge - the commit was not signed
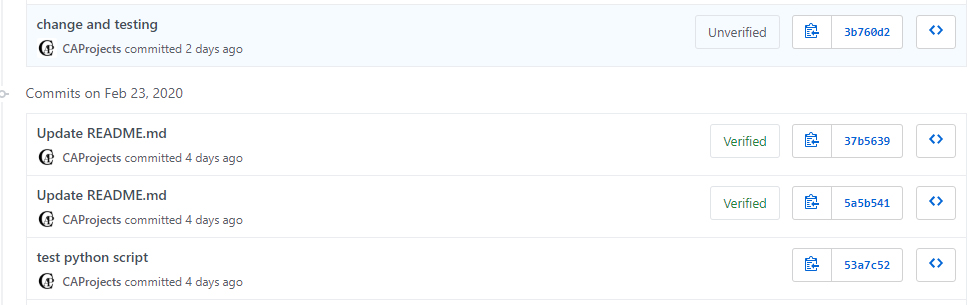
This is a handy way to monitor commits and potential malicious activity, if you make a commit via a web browser on GitHub or using GitHub desktop app, it will automatically sign your commits, this is only for when using git though terminal or via a 3rd party program. I have this set up on my laptop, PC pi-top and Xavier NX


