Hey everyone…. I just wanted to run through the installation of Syncthing in case you’d like to install this yourself on your pi-top(s).
Please note (disclaimer): I recommend backing up your pi-top boot card/drive in case these instructions don’t go well and cause issues. I am adding this guide for how I’ve accomplished this and this guide is for informational purposes only and no mishaps due to errors or inadvertent typos, etc. using this guide will be the responsibility of me or the owner of this forum. Thank you.
Overview:
Syncthing is light-weight and doesn’t use a lot of resources but is powerful enough to secure this connection between devices with a strong encryption certificate that must match between devices before any files will be transmitted. Syncthing does this sync file transmission in real-time which is what makes to really powerful. For example, I work on Python code on a Mac and any time a Python file is updated, it immediately is transmitted to all pi-top devices that are powered on and connected to the local network.
This forum post covers the installation on the Raspberry Pi architecture… but there is a Windows and Mac installation that you will find with an easy installer from their website if you’d like to sync files between a Mac and PC to and from a your pi-top devices.
This is especially handy if you have multiple pi-top[4] devices, for example, and you want the same code on all of them. In my case, I have 3 and I want to keep the same Python code on all 3 without having to VNC to each one and to add the code multiple times or put it on USB flash to copy it multiple times.
When you see Syncthing in action, you’ll find other uses for it as well. For example, using it to back up important files as a sort of local repository of files for work, hobbies or to save those important family photos, etc.
Ready? Let’s get started:
Whenever installing something new, make sure your pi-top is up-to-date. You can run the updater from the pi-topOS menu or even do this in Terminal (which is where the rest of the work in general will be done).:
sudo apt-get update
sudo apt-get upgrade
Now we make sure that apt-transport-https is installed. By default, this may is typically not installed and it doesn’t hurt to make sure it’s installed:
sudo apt install apt-transport-https
Next step is to add the Syncthing PGP keys to the package manager’s key chain to make sure the packages installed are properly signed and aren’t coming from an unexpected resource:
curl -s https://syncthing.net/release-key.txt | sudo apt-key add -
This step will handle added the repository:
echo "deb https://apt.syncthing.net/ syncthing stable" | sudo tee /etc/apt/sources.list.d/syncthing.list
After this, Syncthing is installed from the repository but we need to update the package list:
sudo apt update
At this point, we can get Syncthing installed:
sudo apt install syncthing
Now we need to give access to the Syncthing interface to other systems on the network, otherwise, it is only accessible on this device and, well, that’s just not very useful.
If you don’t know the IP address of your device (I typically set up a static IP address for my pi-top[4] so it always uses the same IP and this is important because the Syncthing will connect via the IP address and having it the same every time makes configuration easier) type the following command to get the pi-top’s IP address:
hostname -I
Now we start Syncthing from the command line, but it won’t fully run, so we let it run through the initial start just to generate configuration files needed:
syncthing
(Usually after about 15 seconds or so, you just need to kill it by holding down “Control” and press “C”)
Now we have config files to edit.
First we’ll edit a config.xml file located in ~/.config/syncthing:
nano ~/.config/syncthing/config.xml
In this file, you’ll need to find an entry for <address>127.0.0.1:8384</address>. By holding “Control” and then pressing “W”, you can do a search. Search for the line as described, because there are other lines in the XML with <address></address>, but you want the one with the 127.0.0.1 address. Now modify it (in this guide, I am using nano) to change 127.0.0.1 to your pi-top’s IP address. Example, changing it like this <address>127.0.0.1:8384</address> to <address>192.168.1.100:8384</address> (example if your pi-top’s IP address is 192.168.1.100). Then hold down “Control” and press “X” and then “Y” and then “Enter/Return” to save that change.
Next we will set up Syncthing as a service on the pi-top. Using nano again, we will create a new file named syncthing.service:
sudo nano /lib/systemd/system/syncthing.service
In this new file add the following lines:
[Unit]
Description=Syncthing - Open Source Continuous File Synchronization
Documentation=man:syncthing(1)
After=network.target
[Service]
User=pi
ExecStart=/usr/bin/syncthing -no-browser -no-restart -logflags=0
Restart=on-failure
RestartSec=5
SuccessExitStatus=3 4
RestartForceExitStatus=3 4
#Hardening
ProtectSystem=full
PrivateTmp=true
SystemCallArchitectures=native
MemoryDenyWriteExecute=true
NoNewPrivileges=true
[Install]
WantedBy=multi-user.target
Then hold down “Control” and press “X” and then “Y” and then “Enter/Return” to save that change.
(This tell the system how to handle Syncthing on the Raspberry Pi.)
Now, with the service created, we can enable it to start at boot:
sudo systemctl enable syncthing
Next we can start the service:
sudo systemctl start syncthing
Then we can check status of the service running. We are looking for it to show that it is Active: active (running):
sudo systemctl status syncthing
As long as it shows that it is active, we are in the home stretch! 
Note: Hold down “Control” and press “C” to exit the status dialogue.
Accessing the Syncthing Web Interface and Final Configuration
Syncthing will now have a few settings we will need to take care of for final configuration. These are accessed via a browser from a remote computer.
STEP 1:
http://[PITOP-IPADDRESS]:8384
(Step 1) On another device on your network (recommended is a laptop or desktop) visit the following URL (replacing [PITOP-IPADDRESS] with your pi-top’s actual IP address you got earlier when you used the hostname -I command.
STEP 2:
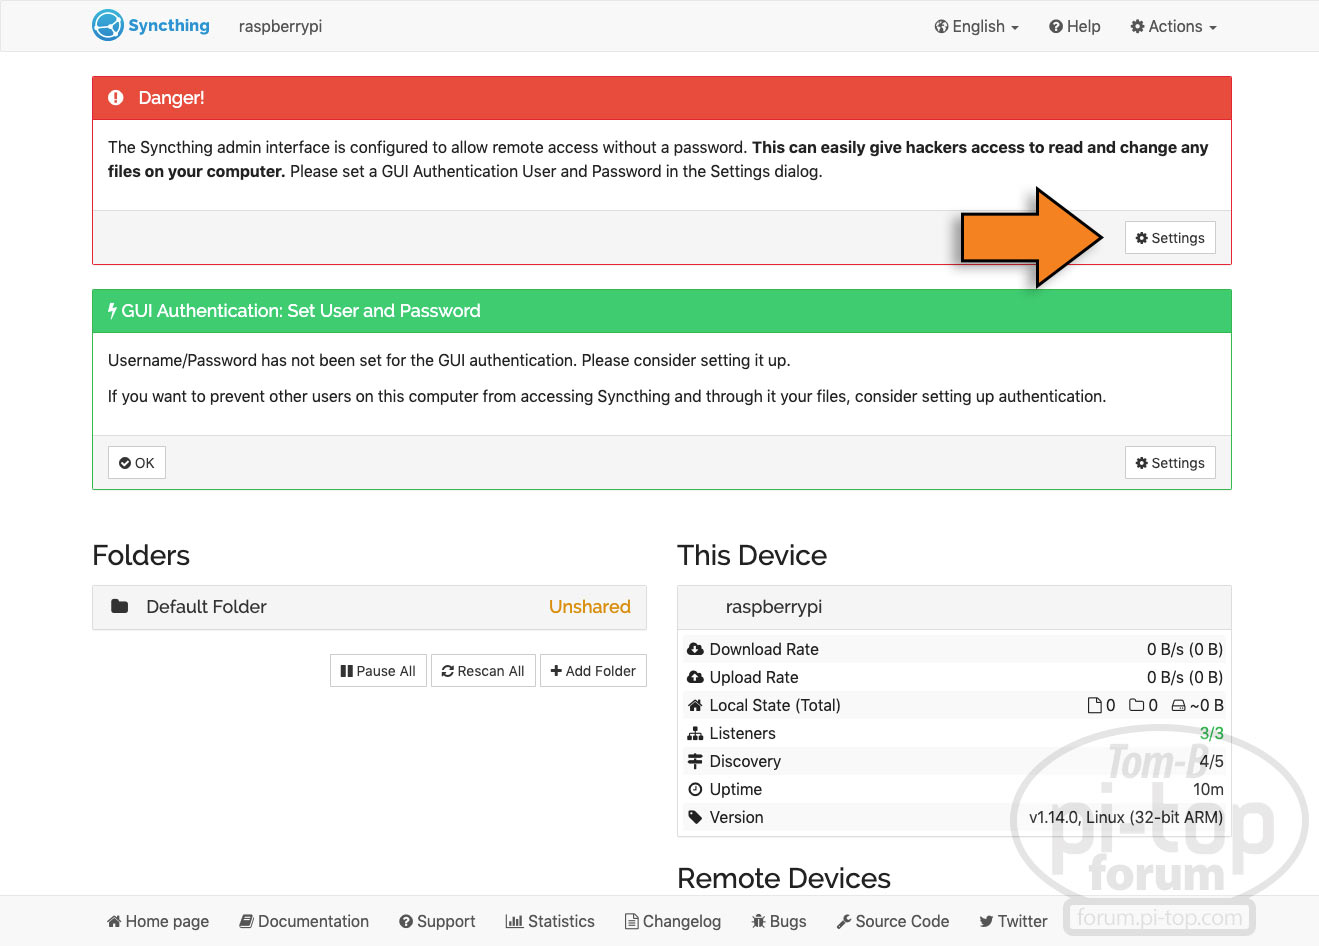
(Step 2) Now, in your browser, you will see the Syncthing interface with a “Danger!” Warning and we’ll take care of that first. Click “Settings”. (If you don’t see the Danger! warning here, see the alternate way to get to “Settings” below.)

Note: Alternatively, you can click (1) “Actions” and then (2) “Settings”.
STEP 3:
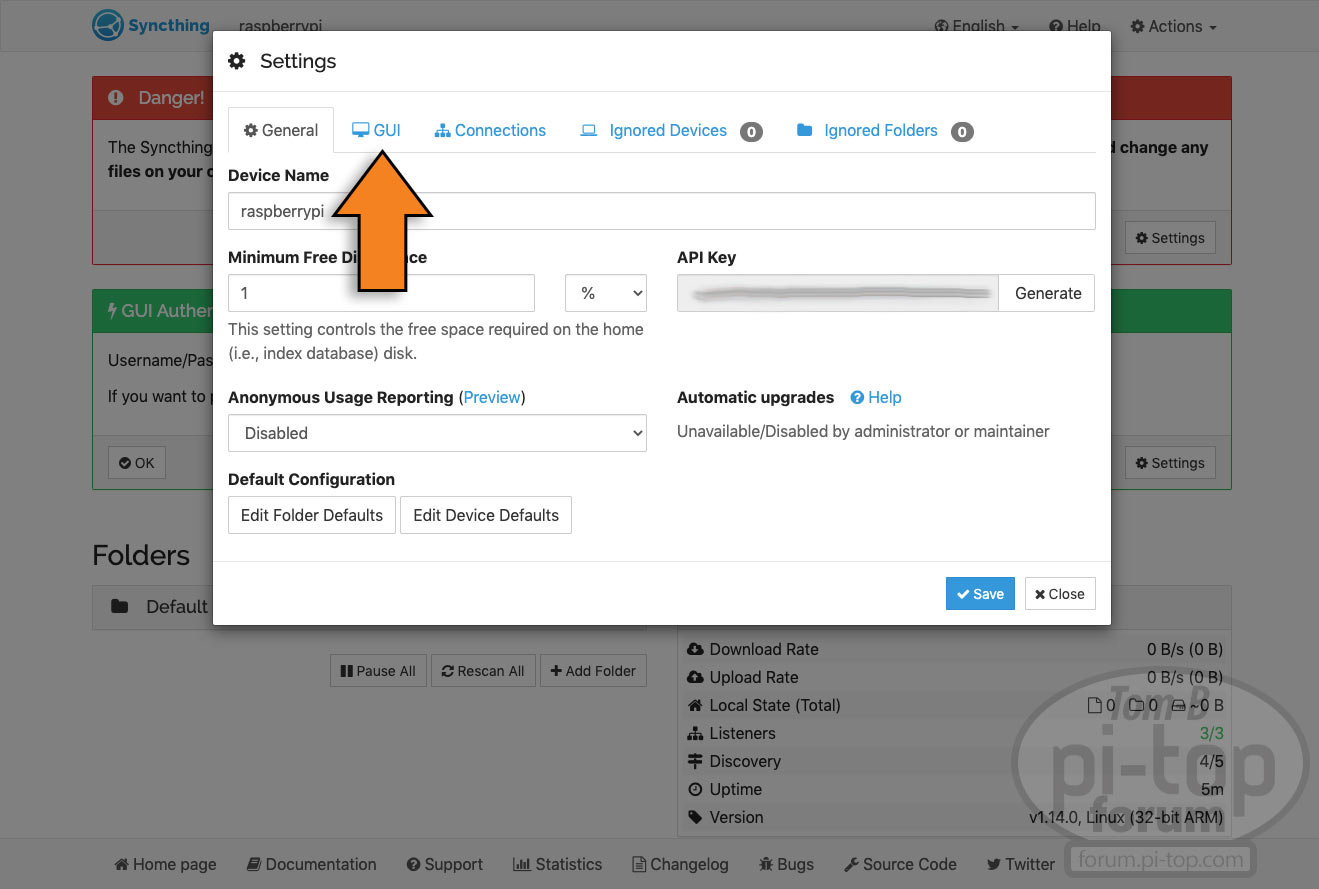
(Step 3) Next click the GUI tab.
STEP 4:
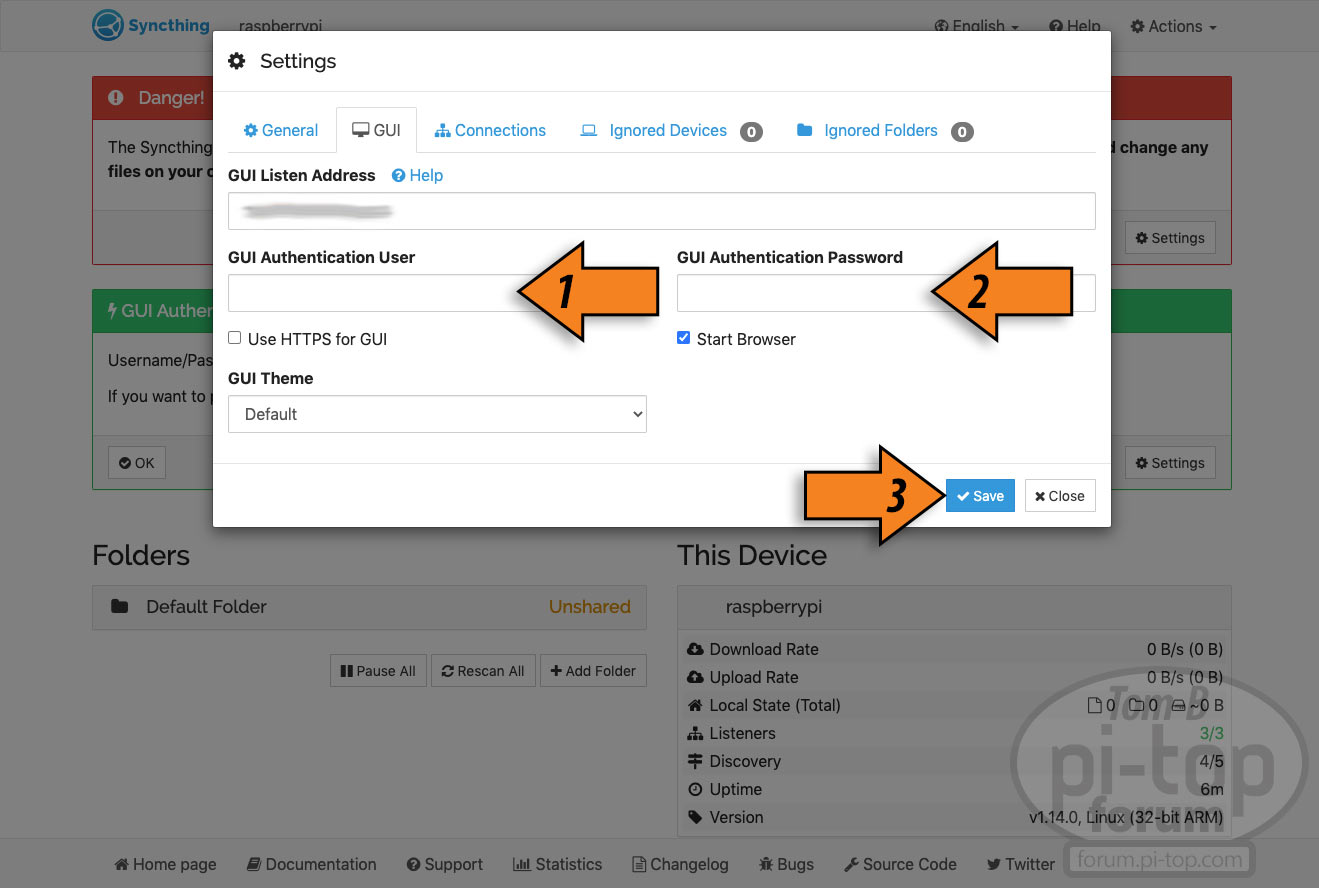
(Step 4) Enter a user name you want to use for the (1) “GUI Authentication User” and the (2) “GUI Authentication Password”. (Note: These details will be used any time you access Syncthing from another device. Syncthing will show you a sign-in pop-up dialing and this is the user name and password you will use for that access.)
Then click “Save” (3)
Warning: You will likely get kicked out of the web interface at this point and it may ask you to log in now. This is normal, just enter the user name and password you’ve set just now, to confirm the Authentication User.
Syncthing Setup to Connect Devices
At this point, Syncthing is installed on the pi-top but we need to connect it to another device(s) to start syncing files!
It’s also at this point, you would probably consider an installation of Syncthing on the desktop or laptop to sync your pi-top with – because the point of Syncthing is the sync of files between at least two devices.
The following steps to configure Syncthing on the pi-top will also be the same on another device after installing it in Windows or the Mac OS, so you can follow these for any device that has Syncthing installed. (Visit Syncthing’s website at, https://www.syncthing.net/downloads/ to download a Windows or Mac installer.)
STEP 1:
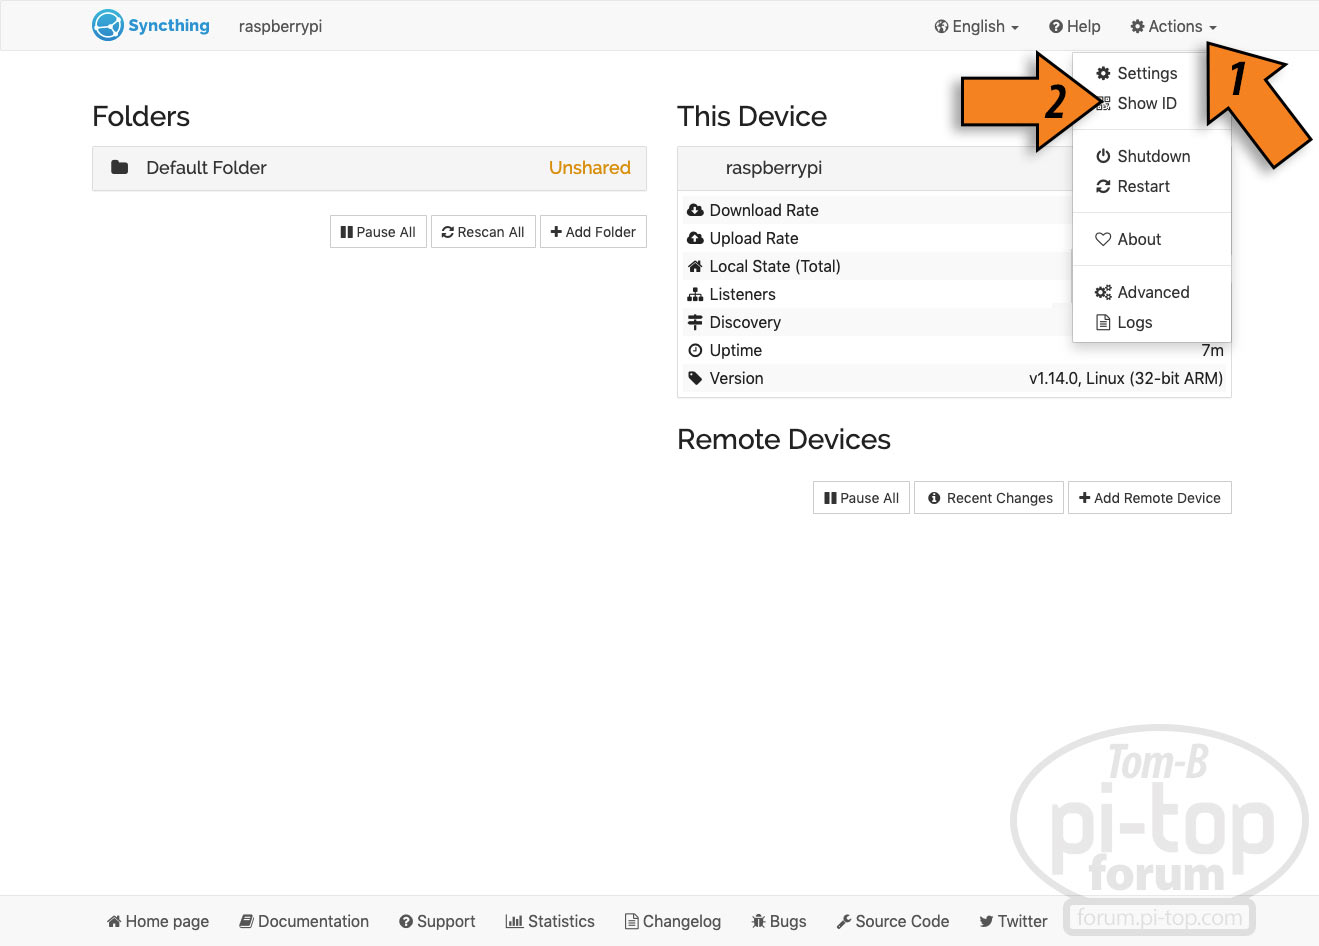
(Step 1) Click (1) “Actions” and then (2) “Show ID”.
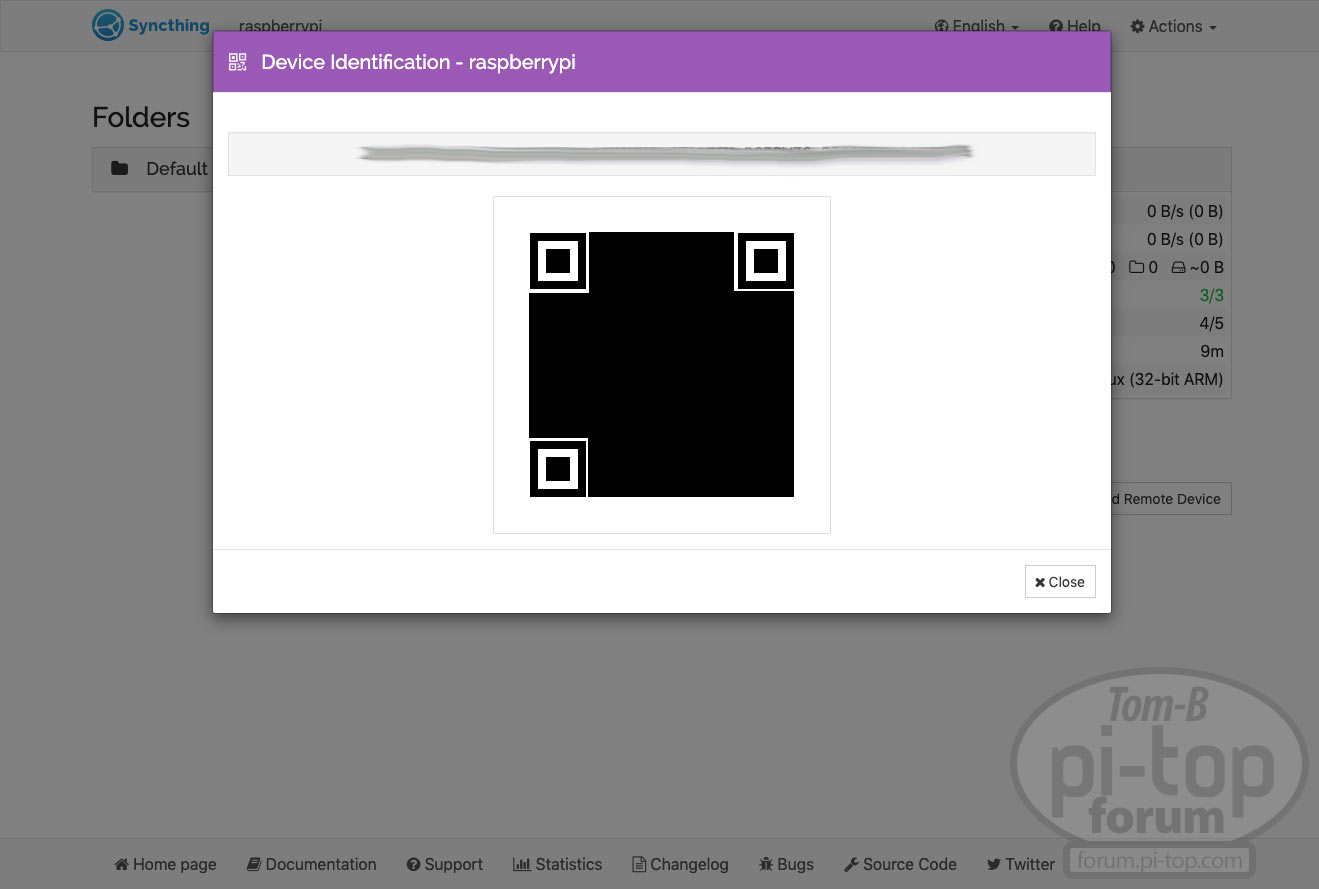
Note: Each device will get a unique ID – the screen looks like this (my specific details hidden) with a unique ID and a QR code that can be scanned.
STEP 2:
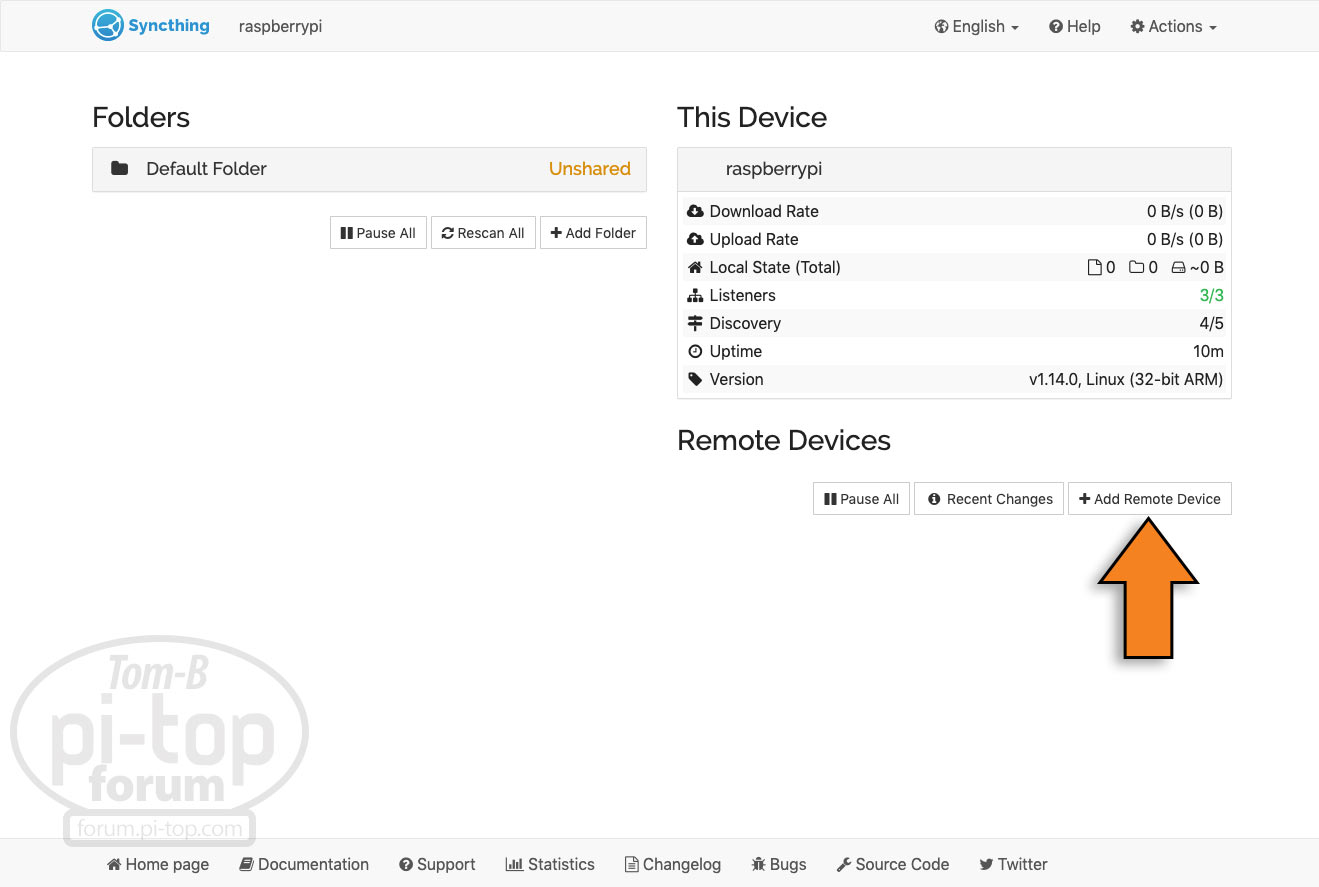
(Step 2) On one device, you will click “+ Add Remote Device”.
STEP 3:
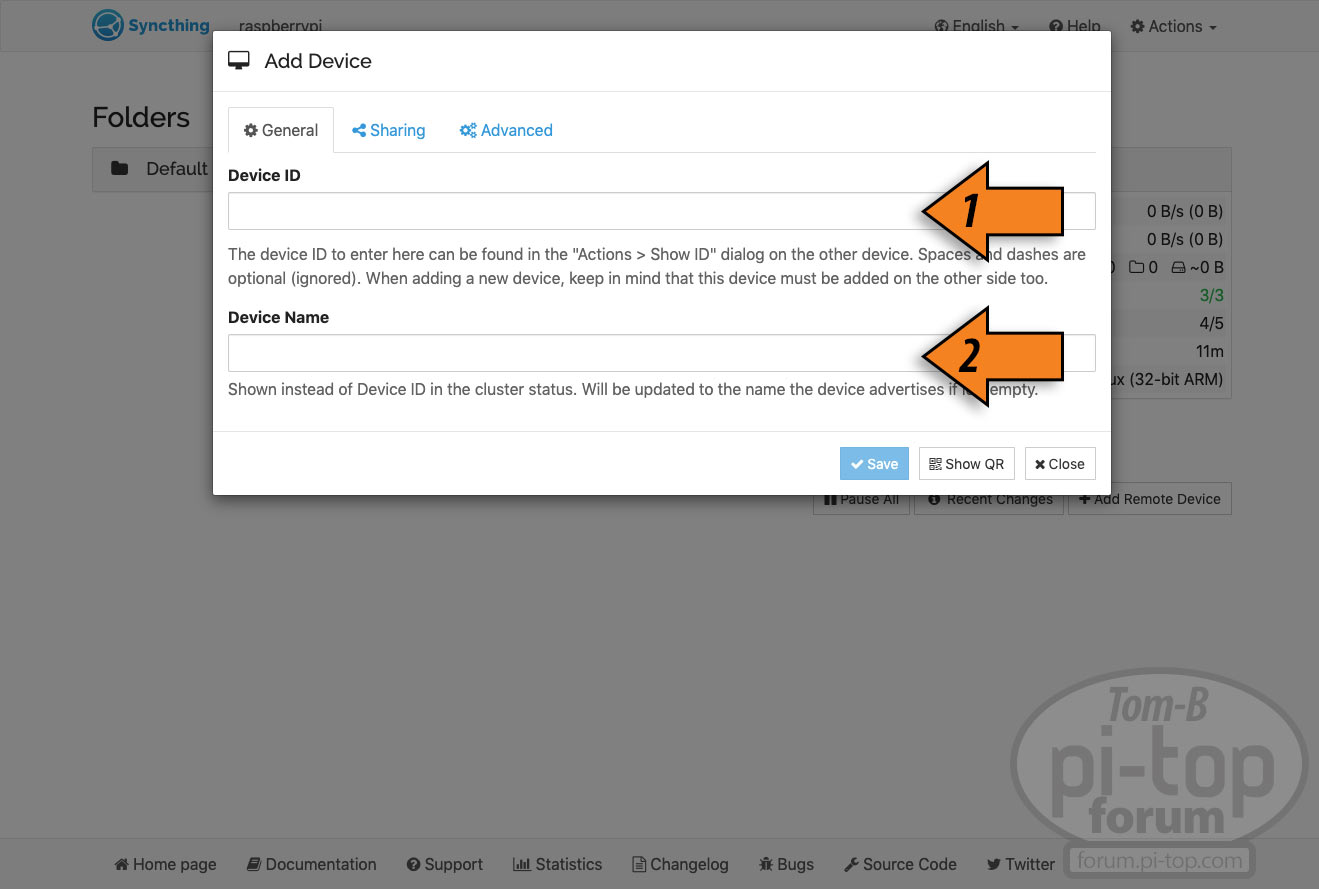
(Step 3) You will need the other device’s (1) unique ID and a (2) name for the device. (Note: The remote device will need confirmation of the connection after you click “Save”.)
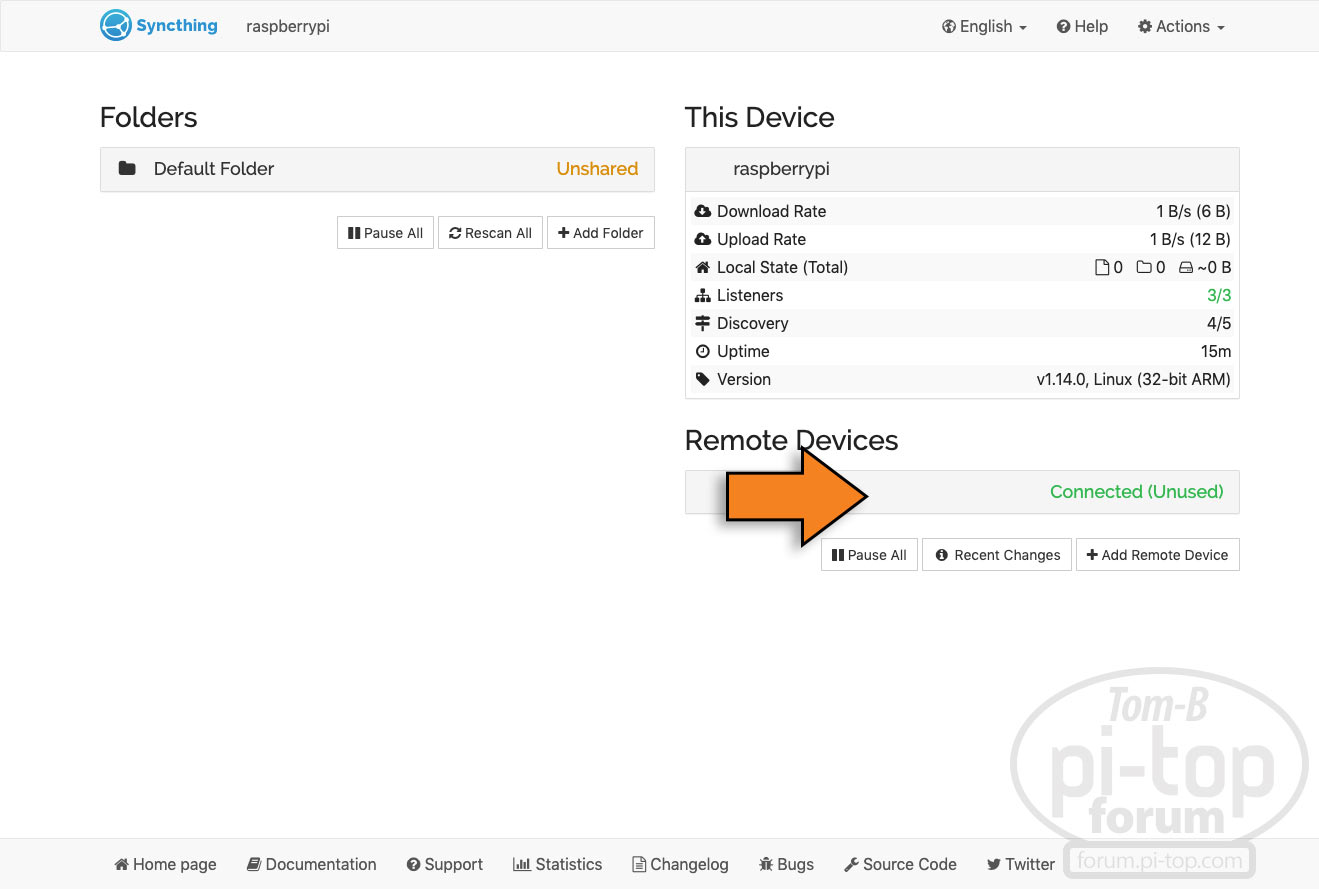
You see that the device is connect but “Unused”. This is because no folders have been shared yet. That’s next.
STEP 4:
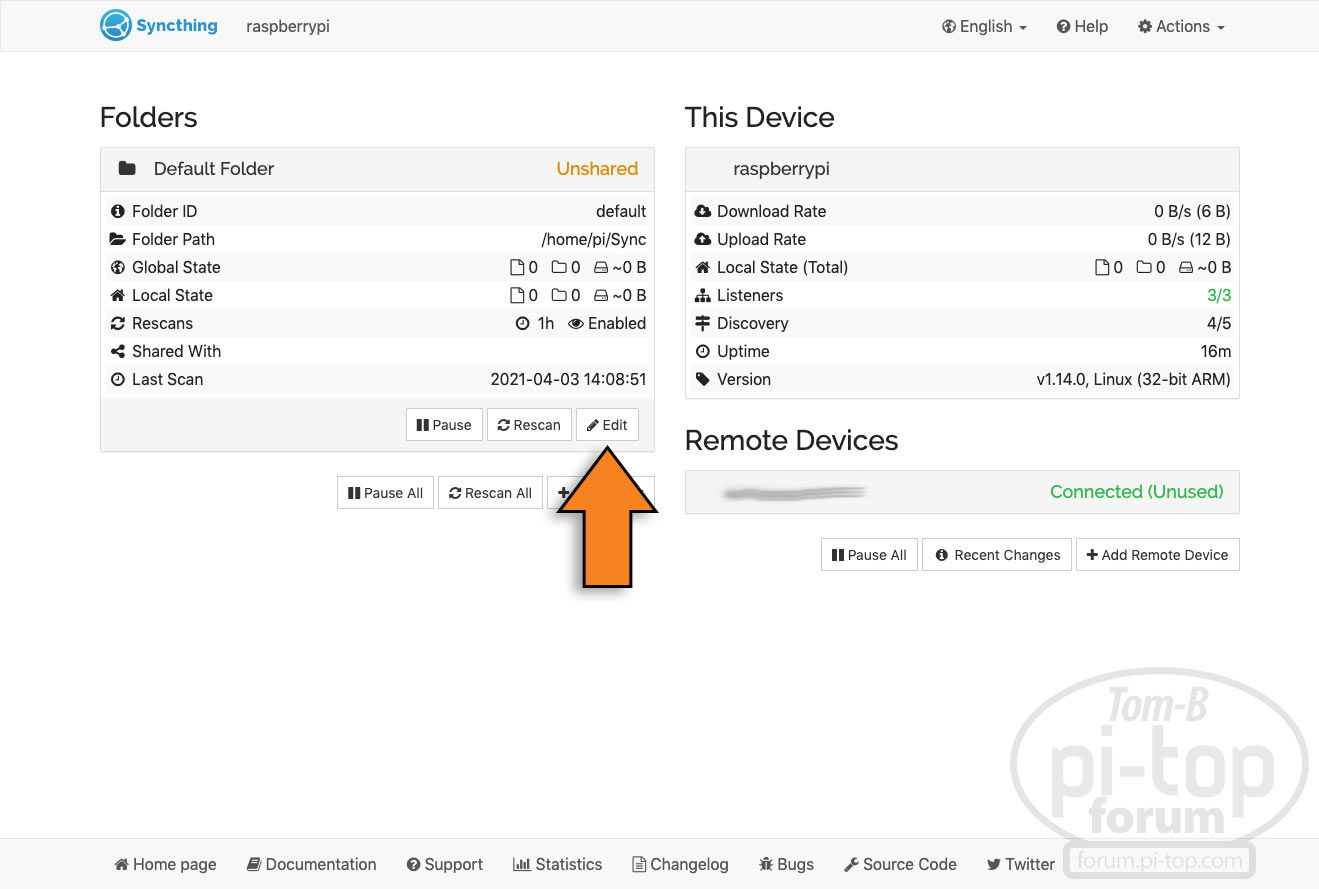
(Step 4) Click “Edit” to configure the "Sharing from the pi-top.
STEP 5:

(Step 5) Then click “Sharing” to find what devices this folder would be connected with.
STEP 6:
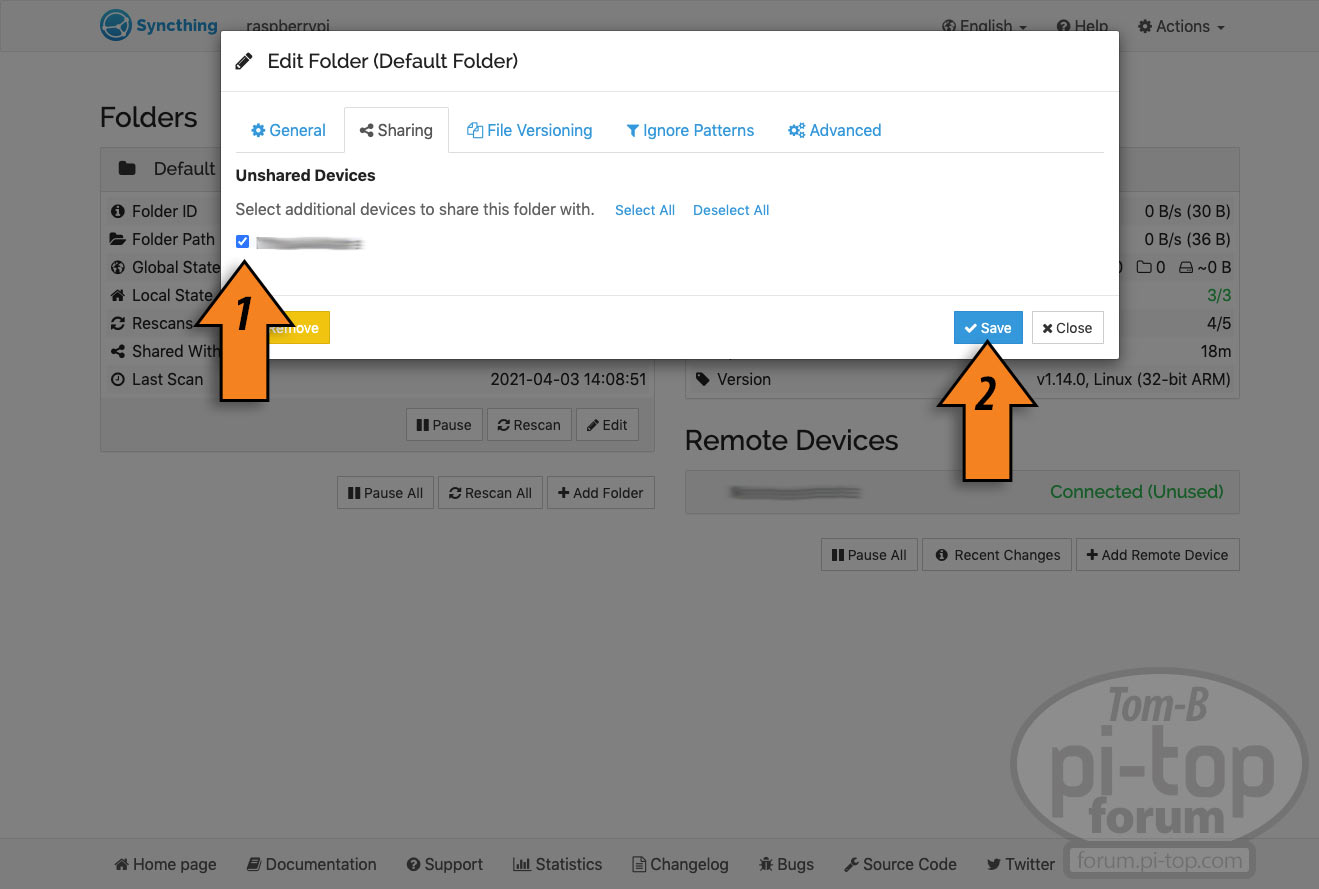
(Step 6) Click the box next to the device to share with to select that device and then click “Save”.
(Note: a folder named “Sync” is automatically created and it is configured as “Default Folder”)
CONCLUSION AND SUCCESS:
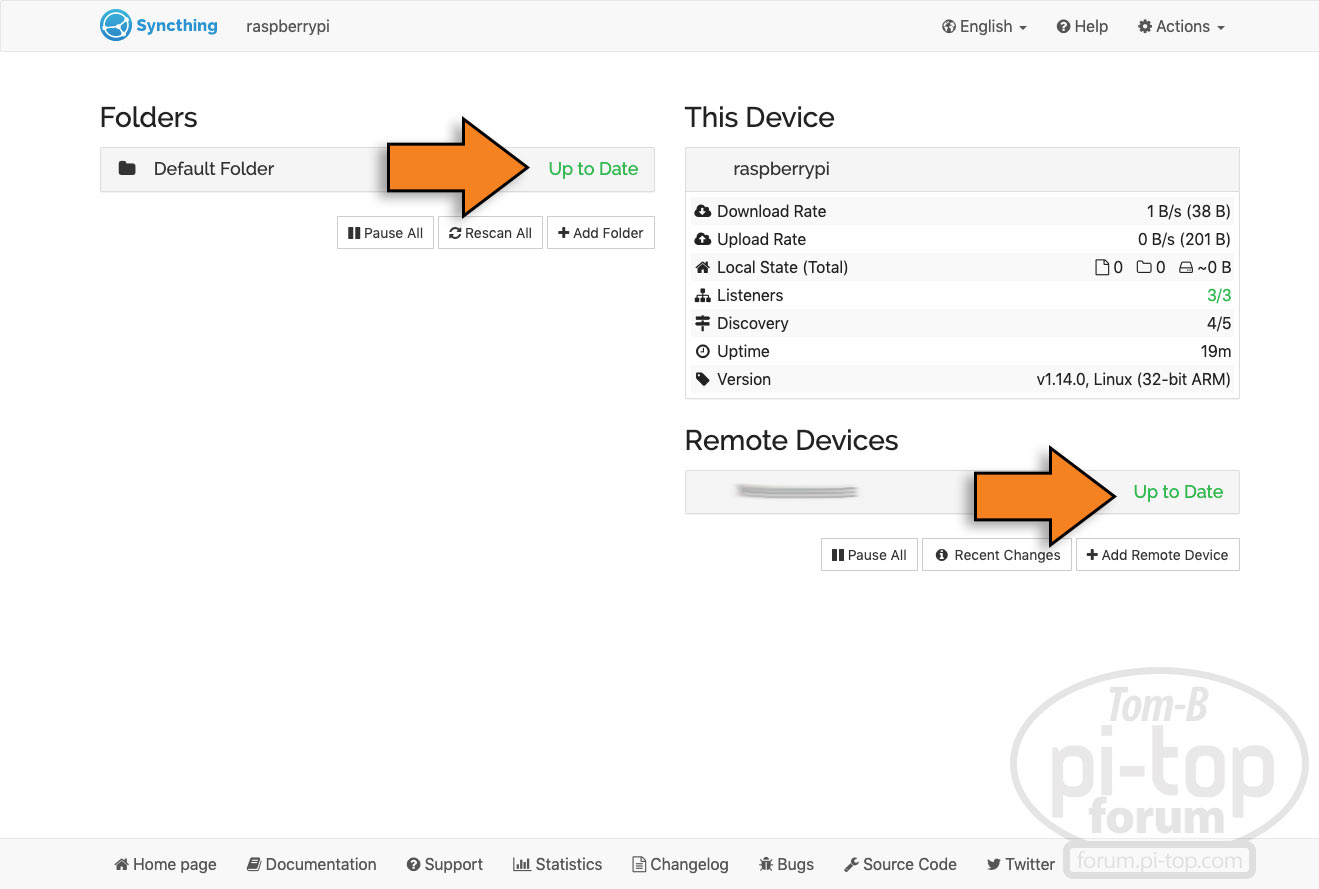
(Above screen) Once a folder is shared and confirmed on the other device, any new files added to that specific folder on any device that it is shared with, will immediately sync (shown by “Up to Date” messages on both devices that all folder files are transmitted).
Note: Syncthing shows a “syncing” meter to indicate that files are being transmitted (both on the sending device and the receiving device).
Closing comments: The multiple edits of this post was to get the formatting of everything as easy as possible to follow. If you find anything that can improve the formatting to make it even more clear, please let me know.


